
Welcome to the dawn of a new era in content generation, where the power of
artificial intelligence meets the limitless potential of human creativity.
Welcome to MidJourney! MidJourney is not just a tool, it’s a revolution. It’s a groundbreaking AI platform that empowers you to generate images from text prompts, transforming the
abstract into the tangible, and the imagined into the visible.
It’s a bridge between words and visuals, a journey from thought to reality. It’s a testament to how far we’ve come into the realm of technology, and a glimpse into the exciting future that lies ahead.
In this course, we will explore the vast capabilities of MidJourney. We will learn how to interact with the MidJourney bot on Discord, using commands to create images, change settings, monitor user info, and perform other tasks.
We will delve into the intricacies of blending images, generating prompts, and managing custom options.
Chapter 1: Embarking on Your Midjourney Adventure
- Unveiling the Magic of Midjourney: Discover the revolutionary platform that’s transforming digital art.
- The Science Behind the Art?: Understand the concepts of the AI technology that powers Midjourney.
- Your First Steps with Midjourney and Discord: A beginner-friendly Guide to Getting Started.
- Commanding the AI: An overview of commands to control your creative process.
- Customizing Your Experience: A Look at the Settings that shape your Midjourney.
- Fast Mode vs. Relax Mode: Understanding the two modes.
- Exploring Midjourney’s Models: Learn the unique capabilities of each model to choose the best for your vision.
Chapter 2: The Art of Crafting Images from Text Prompts
- The Power of Prompts: Learn how different types of prompts can shape your images.
- The Art of Writing Effective Text Prompts: Master the skill of crafting compelling prompts.
- Decoding Prompts: Understand the language of prompts and how AI interprets them.
- Building Your Prompts: Learn the structure of effective prompts for better results.
- Choosing the Right Words: Discover the importance of word choice in shaping your images.
- Key Aspects to Consider: Learn to incorporate important elements into your prompts.
- Avoiding Pitfalls: Identify common mistakes and learn how to avoid them.
- Creating a Palette of Styles: Use Midjourney to create images in a variety of styles.
- Mastering Parameters: Unleashing the Full Potential of Midjourney
- Remix Mode: Use your creativity with the power of Remix Mode.
Chapter 3: Advanced Techniques and Artistic Exploration
- The Boundless Inspiration of Midjourney: Discover the unlimited source of inspiration and guidance in the Midjourney community.
- Realism in AI ART: Learn to use Midjourney to create stunningly realistic images.
- Abstract Creations: Explore the potential of Midjourney for creating abstract art.
- Animating Imagination: Crafting Cartoon Creations with Midjourney
- Composite Images: Master the technique of creating composite images with Midjourney.
BONUS: Learn how to Make Money using Midjourney
- Transforming Pixels into Profits: Selling Art Prints
- Click, Upload, Earn: Selling Stock Photos with AI
- The Art of Selling Ideas: Monetizing Midjourney Prompts
- The New Age of Freelancing: Offering AI Art Generation as a Service
- Storytelling with AI: Creating Graphic Novels and Children’s Books
- The NFT Gold Rush: Creating and selling with Midjourney
This course is designed to take you from a beginner to a proficient user of Midjourney, equipping you with the knowledge and skills to create stunning AI-generated images. Whether you’re an artist, designer, or just someone who loves to create, this course will open up a whole new world of possibilities. Let’s embark on this exciting journey together!
Chapter 1: Introduction to MidJourney
Unveiling the Magic of Midjourney?
Welcome to the first chapter of our journey into the world of MidJourney. MidJourney is a groundbreaking AI platform that allows you to generate images from text prompts. It’s a tool that brings together the power of artificial intelligence and human creativity, opening up a whole new realm of possibilities for content generation.
The Science Behind the Art?
MidJourney operates primarily through Discord, where users can interact with the MidJourney bot using various commands. These commands allow you to create images, change settings, monitor user info, and perform other tasks.
The magic of MidJourney lies in its ability to interpret text prompts and generate corresponding images. This is achieved through advanced machine learning algorithms that have been trained on vast amounts of data. The result is an AI that can understand your prompts and create images that match your vision.
Your First Steps with Midjourney and Discord
To start working with MidJourney, you’ll first need to join a Discord server where the MidJourney bot is active. Once you’re in, you can start interacting with the bot using the various commands.
In this chapter, we’ll cover the basics of using MidJourney on Discord, including how to use the key commands and how to troubleshoot common issues. We’ll also provide tips and tricks to help you get the most out of MidJourney.
By the end of this chapter, you’ll have a solid understanding of what MidJourney is, how it works, and how to start using it on Discord. You’ll be ready to start creating your own images from text prompts, and you’ll be well on your way to becoming a MidJourney expert.
Stay tuned for the next chapter, where we’ll delve deeper into the art of creating images from text prompts. We’ll explore how to write effective prompts, how to use MidJourney to create different styles of images, and how to troubleshoot common problems. The journey is just beginning, and we’re excited to have you on board.
Step 1: Join the Discord
To get started with MidJourney, visit their homepage and click the “Join the Beta” button.
This will take you to a screen where you can continue to Discord and register for the service. Once you have registered, you can access the web-based Discord or download the desktop app.
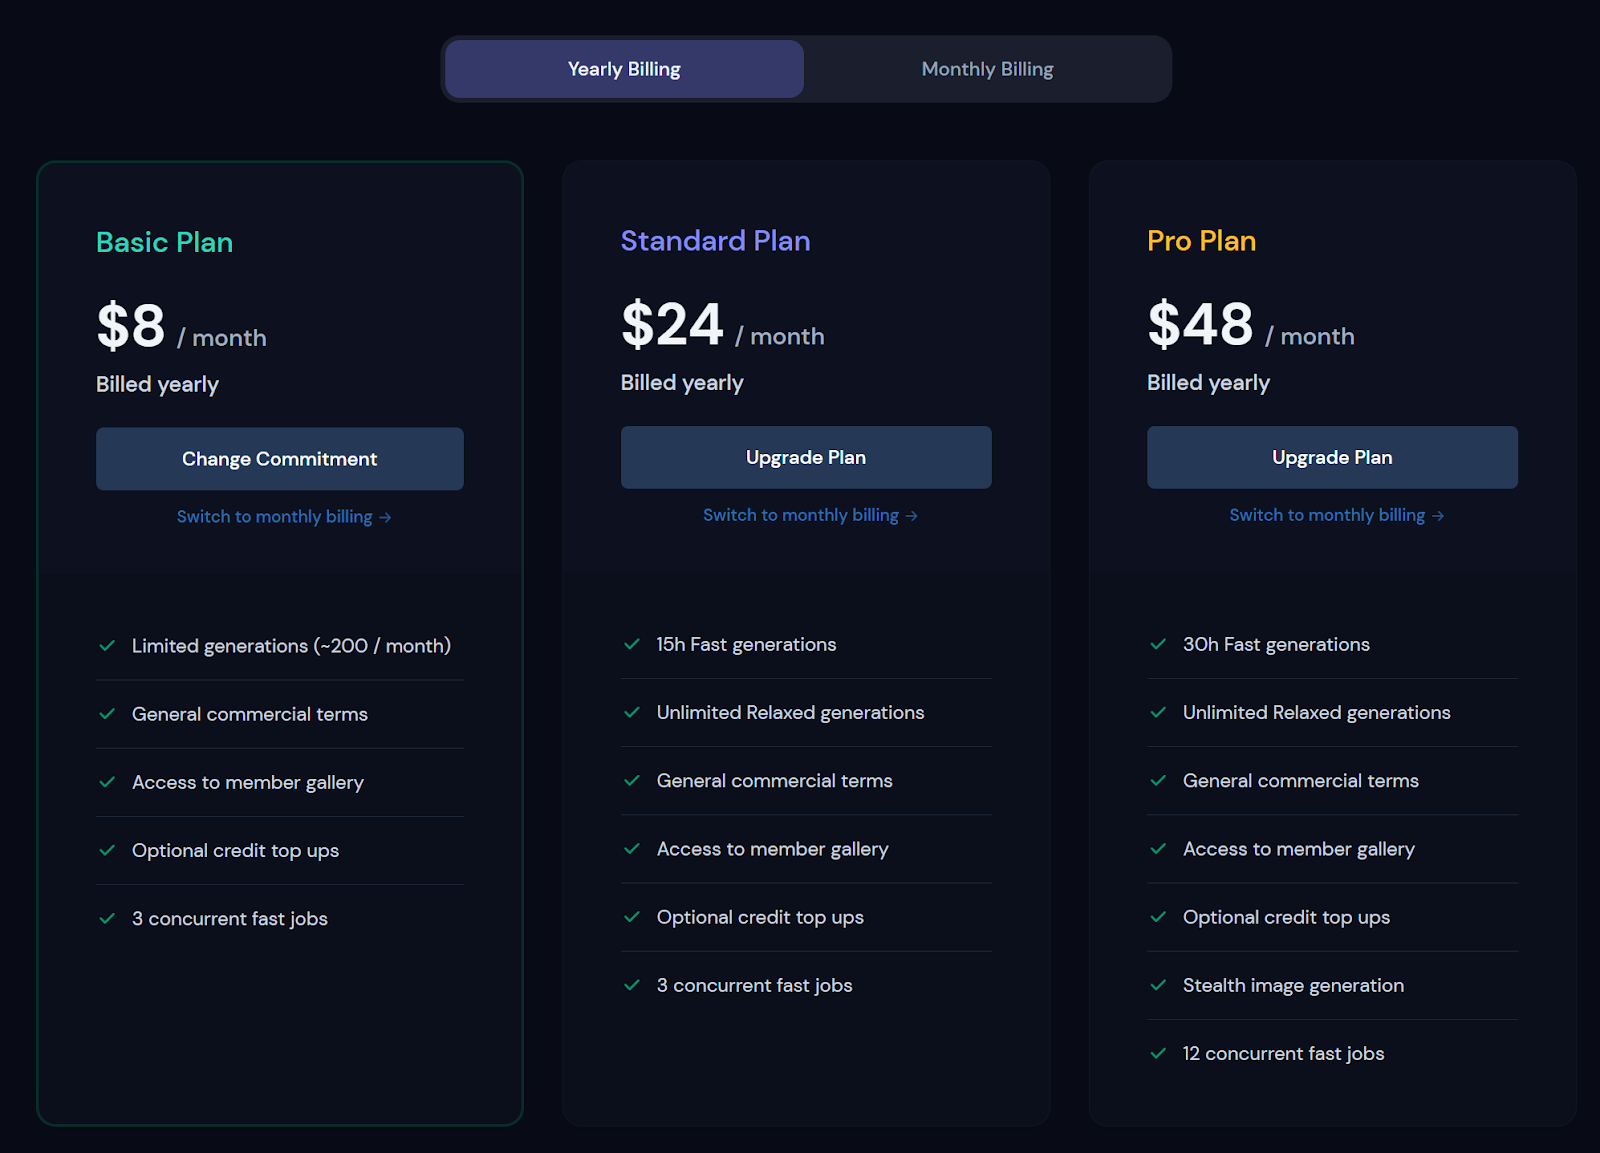
MidJourney offers a limited number of free images, after which you will need to pay a monthly fee for unlimited image creation. The fee is $8 for 200 images and $24 per month for unlimited access.
Step 2: Find a Newbies Channel
You can generate images with the MidJourney Bot on any server that has invited the Bot. Look for instructions on your server on where to use the Bot. On the Midjourney Official Server, you can find a Newbies channel to start.

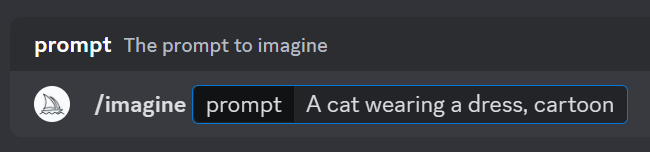
Step 3: Use the /imagine Command
To use the Midjourney Bot on Discord, you need to input a command.
Commands allow you to create images, modify default settings, monitor user information, and perform other useful actions.
To generate an image, use the /imagine command followed by a short text description, known as a Prompt, to specify what kind of image you want. The bot will then generate a unique image based on your input.
Step 4: Wait for the AI to Generate the Image
Wait for Midjourney AI to generate the images based on your description.
The Midjourney Bot takes about a minute to generate four options. Using the Midjourney Bot initiates a free trial, allowing users to perform roughly 25 Jobs.
A Job is any action that utilizes the Bot, including the /imagine command to generate a grid of images, upscale images, or create image variations. To monitor your remaining free trial time, use the /info command to view the Fast Time Remaining.
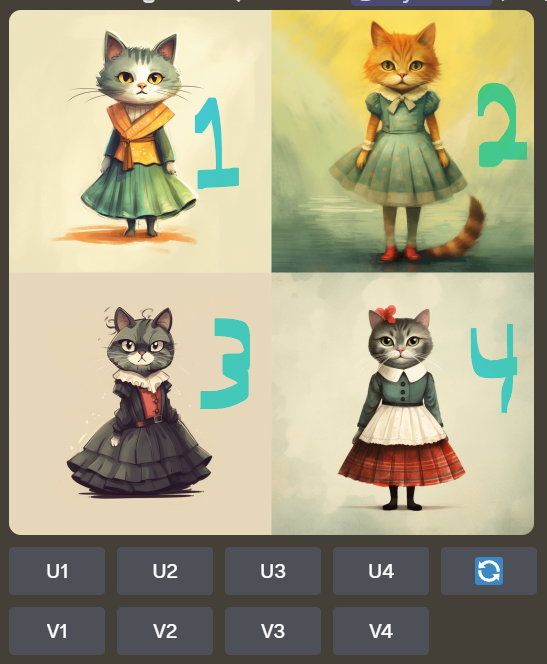
Step 5: Review the Generated Images – Upscale or Create New Variations
After the initial image grid has finished generating, two rows of buttons appear.
The “U” button upscales the size of the selected image, producing a larger version with added details. The “V” button generates slight modifications of the selected image in the grid. This produces a new grid of images that are similar in style and composition to the original selected image.
The 🔁 (re-roll) reruns a Job. In this case, it would rerun the original prompt producing a new grid of images. You can send the final image to yourself by using the envelope icon in the chat and save or download the image for future use.
Comment: Keep the commands and settings explanation as a cheat sheet and don’t try to learn it all (it’s a waste of your precious time).
Commanding the AI
As we learn users can interact with the MidJourney bot using various commands. Here are some of the key commands you can use:
- /ask: This command allows you to ask a question and get an answer.
- /blend: This command lets you blend two images together.
- /daily_theme: Use this command to toggle notification pings for the #daily-theme channel update.
- /describe: This command writes four example prompts based on an image you upload.
- /fast: This command switches the bot to Fast mode.
- /help: This command shows helpful basic information and tips about the MidJourney Bot.
- /imagine: This command generates an image using a text prompt.
- /info: This command allows you to view information about your account and any queued or running jobs.
- /settings: This command allows you to view and adjust the MidJourney Bot’s settings.
- /prefer option: This command allows you to create or manage a custom option.
- /show: This command uses an image’s Job ID to regenerate the Job within Discord.
- /relax: This command switches the bot to Relax mode.
- /remix: This command toggles Remix mode.
For Pro Plan Subscribers, there are additional commands:
- /stealth: This command switches the bot to Stealth Mode.
- /public: This command switches the bot to Public Mode.
- /subscribe: This command generates a personal link for a user’s account page.
Remember, these commands can be used in any Bot Channel, on private Discord servers where the Midjourney Bot has been permitted to operate, or in a direct message with the Midjourney Bot.
If you would like to learn more about commands, follow the MidJourney Command List.
Customizing Your Experience
The /settings command provides toggle buttons for common options like model version, style value, quality value, and upscale version.
Settings also have toggles for /stealth and /public commands.
Model Version
You can choose between different versions of the MidJourney model. The options include MJ Version 1, MJ Version 2, MJ Version 3, MJ Version 4, MJ Version 5, and MJ Version 5.1.
Style Value
The style value sets the stylize parameter used for jobs. You can choose between Style Low (–s 50), Style Med (–s 100), Style High (–s 250), and Style Very High (–s 750). The range goes between 0 to 750.
Other Options
Other options include Raw Mode, Niji Version 4, Public, Fast, and Remix.
You can also reset settings to return to default settings.
Custom Preferences
MidJourney allows you to create custom options using preferred commands to add commonly used parameters to the end of prompts automatically.
If you want to learn how to do it and more about settings, follow Settings and Presets.
Fast Mode vs. Relax Mode – Save your allocated jobs time
Fast and Relax modes are options available to subscribers of the Standard and Pro plans in Midjourney.
Fast Mode is the default setting where the system processes your image generation request immediately, using your allocated GPU time.
Relax Mode, on the other hand, allows you to create an unlimited number of images each month without costing any of your GPU time. However, jobs submitted in Relax Mode are placed into a queue based on how much you’ve used the system.
The wait times for Relax Mode are dynamic and generally range between 0–10 minutes per job. If you use Relax Mode occasionally, you will have shorter wait times compared to subscribers that have used it more frequently. The priority in the queue resets whenever you renew your monthly subscription.
In essence, Fast Mode is for immediate processing at the cost of GPU time, while Relax Mode is for non-urgent jobs with potentially longer wait times but without using up GPU time.
Exploring Midjourney’s Models
MidJourney offers several model versions, each with its own strengths and unique features. Here’s a quick run-through of the differences between them:
Default Model Version 5.1
The Midjourney V5.1 model is the newest and most advanced, released on May 4th, 2023. It has a stronger default aesthetic, making it easier to use with simple text prompts. It also has high coherency, excels at accurately interpreting natural language prompts, produces fewer unwanted artifacts and borders, has increased image sharpness, and supports advanced features like repeating patterns with –tile.
Model Version 5
The Midjourney V5 model produces more photographic generations than the default 5.1 model. This model produces images that closely match the prompt but may require longer prompts to achieve your desired aesthetic.
Model Version 4
The Midjourney V4 was the default model from Nov 2022–May 2023.
This model featured an entirely new codebase and brand-new AI architecture designed by Midjourney and trained on the new Midjourney AI supercluster. Model Version 4 had increased knowledge of creatures, places, and objects compared to previous models. This model has very high Coherency and excels with Image Prompts.
Niji Model 5
The Niji model is a collaboration between Midjourney and Spellbrush tuned to produce anime and illustrative styles with vastly more knowledge of anime, anime styles, and anime aesthetics.
It’s excellent at dynamic and action shots and character-focused compositions.
This model is sensitive to the –stylize parameter. Experiment with different stylization ranges to fine-tune your images.
How to Switch Models
You can switch models by adding the –v parameter to the end of your prompt (e.g., –v 4, –v 5, –v 5.1, –niji 5) or by using the /settings command and selecting your preferred version from the menu.
Remember, each model excels at producing different types of images, so feel free to experiment and find the one that best suits your needs.
Chapter 2: The Art of Crafting Images from Text Prompts
Welcome to the second chapter and the fun part of our journey into the world of MidJourney. In this chapter, we will delve into the heart of what makes MidJourney such a powerful tool: the ability to create images from text prompts.
Creating images from text prompts is a fascinating process that combines the power of language with the capabilities of artificial intelligence. With just a few words, you can conjure up a whole world of visuals, bringing your ideas to life in a way that was previously unimaginable.
We will start by exploring the basics of writing effective text prompts. How specific should you be? What are some strategies for getting the best results? We’ll answer these questions and more, providing you with a solid foundation to start creating your own images.
Next, we’ll look at how to use MidJourney to create different styles of images. Whether you’re interested in realistic images, abstract art, or something in between, MidJourney offers a range of options to suit your needs. We’ll guide you through the process, showing you how to adjust your prompts and settings to achieve your desired aesthetic.
Finally, we’ll address some common problems that users encounter when creating images from text prompts, and provide solutions to help you overcome these challenges. From technical issues to creative blocks, we’ve got you covered.
By the end of this chapter, you’ll have a deep understanding of how to create images from text prompts using MidJourney. You’ll be equipped with the knowledge and skills to start generating your own unique visuals, and you’ll be ready to take your creativity to the next level. So let’s get started!
The Power of Prompts: types of prompts
In MidJourney, there are three main types of prompts you can use to generate images: Text Prompts, Image Prompts, and Multi-Prompts. Each type of prompt offers unique advantages and can be used in different scenarios.
Text Prompts
Text prompts are the most common type of prompt used in MidJourney. They involve providing a textual description of the image you want to create.
For instance, if you type “a tranquil forest with a sparkling stream,” MidJourney will generate an image that matches your description. Text prompts can be short or long and can include various parts of speech, such as adjectives, nouns, and verbs.
Image Prompts
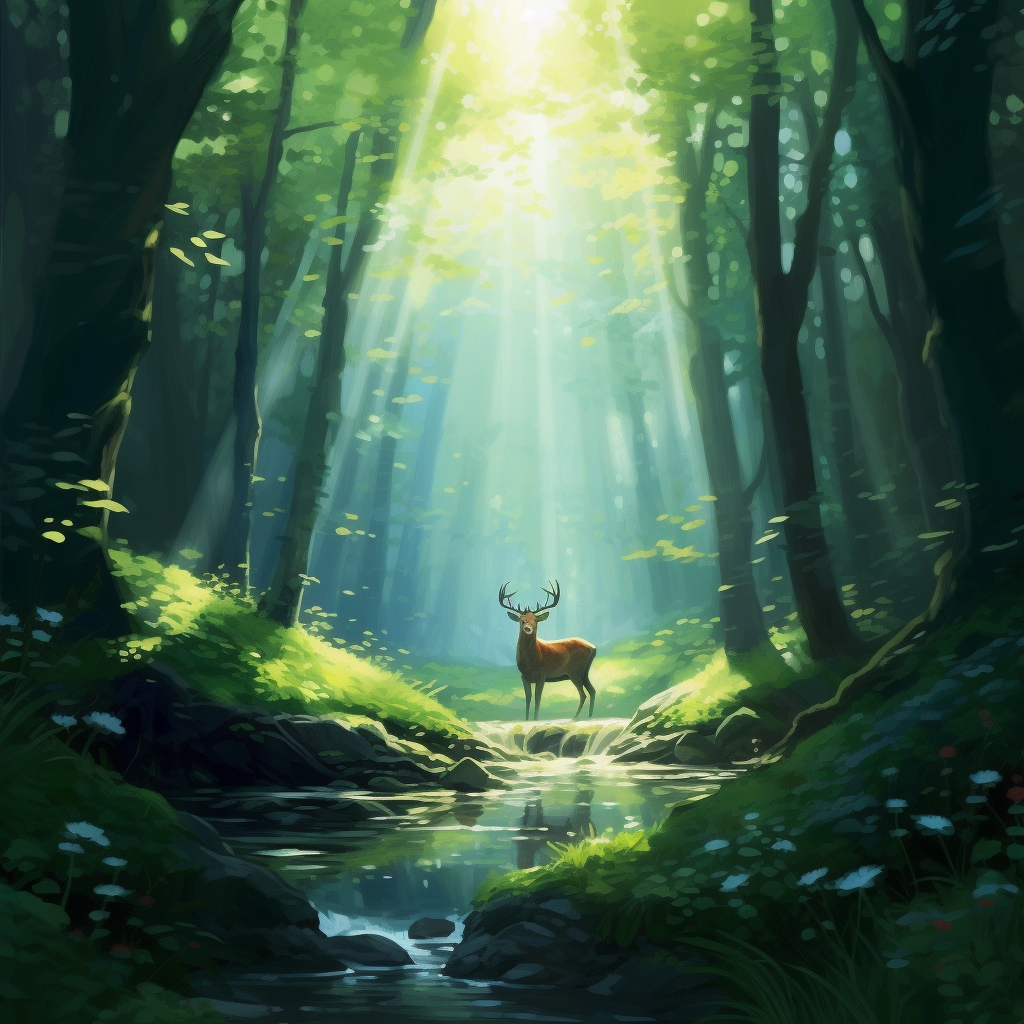
Image prompts involve uploading an image to generate a new image. For example, you could upload the previous photo of the forest and ask MidJourney to create the same kind of forest with a deer. Image prompts are useful when you want to create variations of existing images or experiment with different visual styles.

First, if it’s a local image, send it to the chat so you can copy the link saved on the discord server.

The prompt with the image link:

The result:
Multi-Prompts
Multi-prompts combine both text and image prompts to generate images.
For instance, you could type “a bustling cityscape at dusk” and include an image of a city skyline.
MidJourney will generate an image that matches the description using both the text and the image as input. Multi-prompts are particularly useful when creating complex images that require multiple inputs.

Results:

By understanding these different types of prompts, you can make the most of MidJourney’s capabilities and create a wide range of unique and creative images.
The Art of Writing Effective Text Prompts
Decoding Prompts
Prompts are short text descriptions or keywords that guide the AI in generating the desired image. The more specific and descriptive your prompt, the better the AI can understand your intent and produce a more accurate image.
Step 1: Building Your Prompts
A basic prompt can be as simple as a single word or phrase. More advanced prompts can include one or more image URLs, multiple text phrases, and one or more parameters.

Step 2: Choosing the Right Words
Word choice is crucial. Using more specific synonyms is beneficial. For example, instead of “big,” consider “gigantic,” “enormous,” or “immense.” When possible, eliminate words, as fewer words allow each remaining word to have a stronger impact.
Step 3: Key Aspects to Consider
Make sure to be explicit about any context or details that matter to you.
Consider the following aspects:
- Subject: person, animal, character, location, object, etc.
- Medium: Charcoal drawing, stained glass, graffiti, watercolor, digital art, etc.
- Environment: Mountain peak, dense jungle, outer space, indoors, outdoors, etc.
- Lighting: soft, overcast, neon, studio lights, Golden Hour, etc.
- Color: Earth tones, sepia, vibrant primary colors, cool colors, warm colors, etc.
- Mood: Melancholic, whimsical, dramatic, peaceful, nostalgic, etc.
- Composition: Closeup, Landscape, wide-angle, birds-eye view, macro, etc.
Step 4: Avoiding Pitfalls
Avoid being too vague, using too many words, or not being specific enough about the desired outcome. Use the specific parameters that would help you get the results and don’t add parameters that you don’t understand.
Step 5: Experimenting and Refining
Don’t be afraid to experiment with different prompt structures and refine your prompt to get a better result.
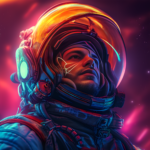
Exercise: Let’s try to create one ourselves
Pick one of each aspect and combine it with a prompt.
For example: Digital art characters in outer space, neon lighting, warm colors, and dramatic, closeup.

The result:
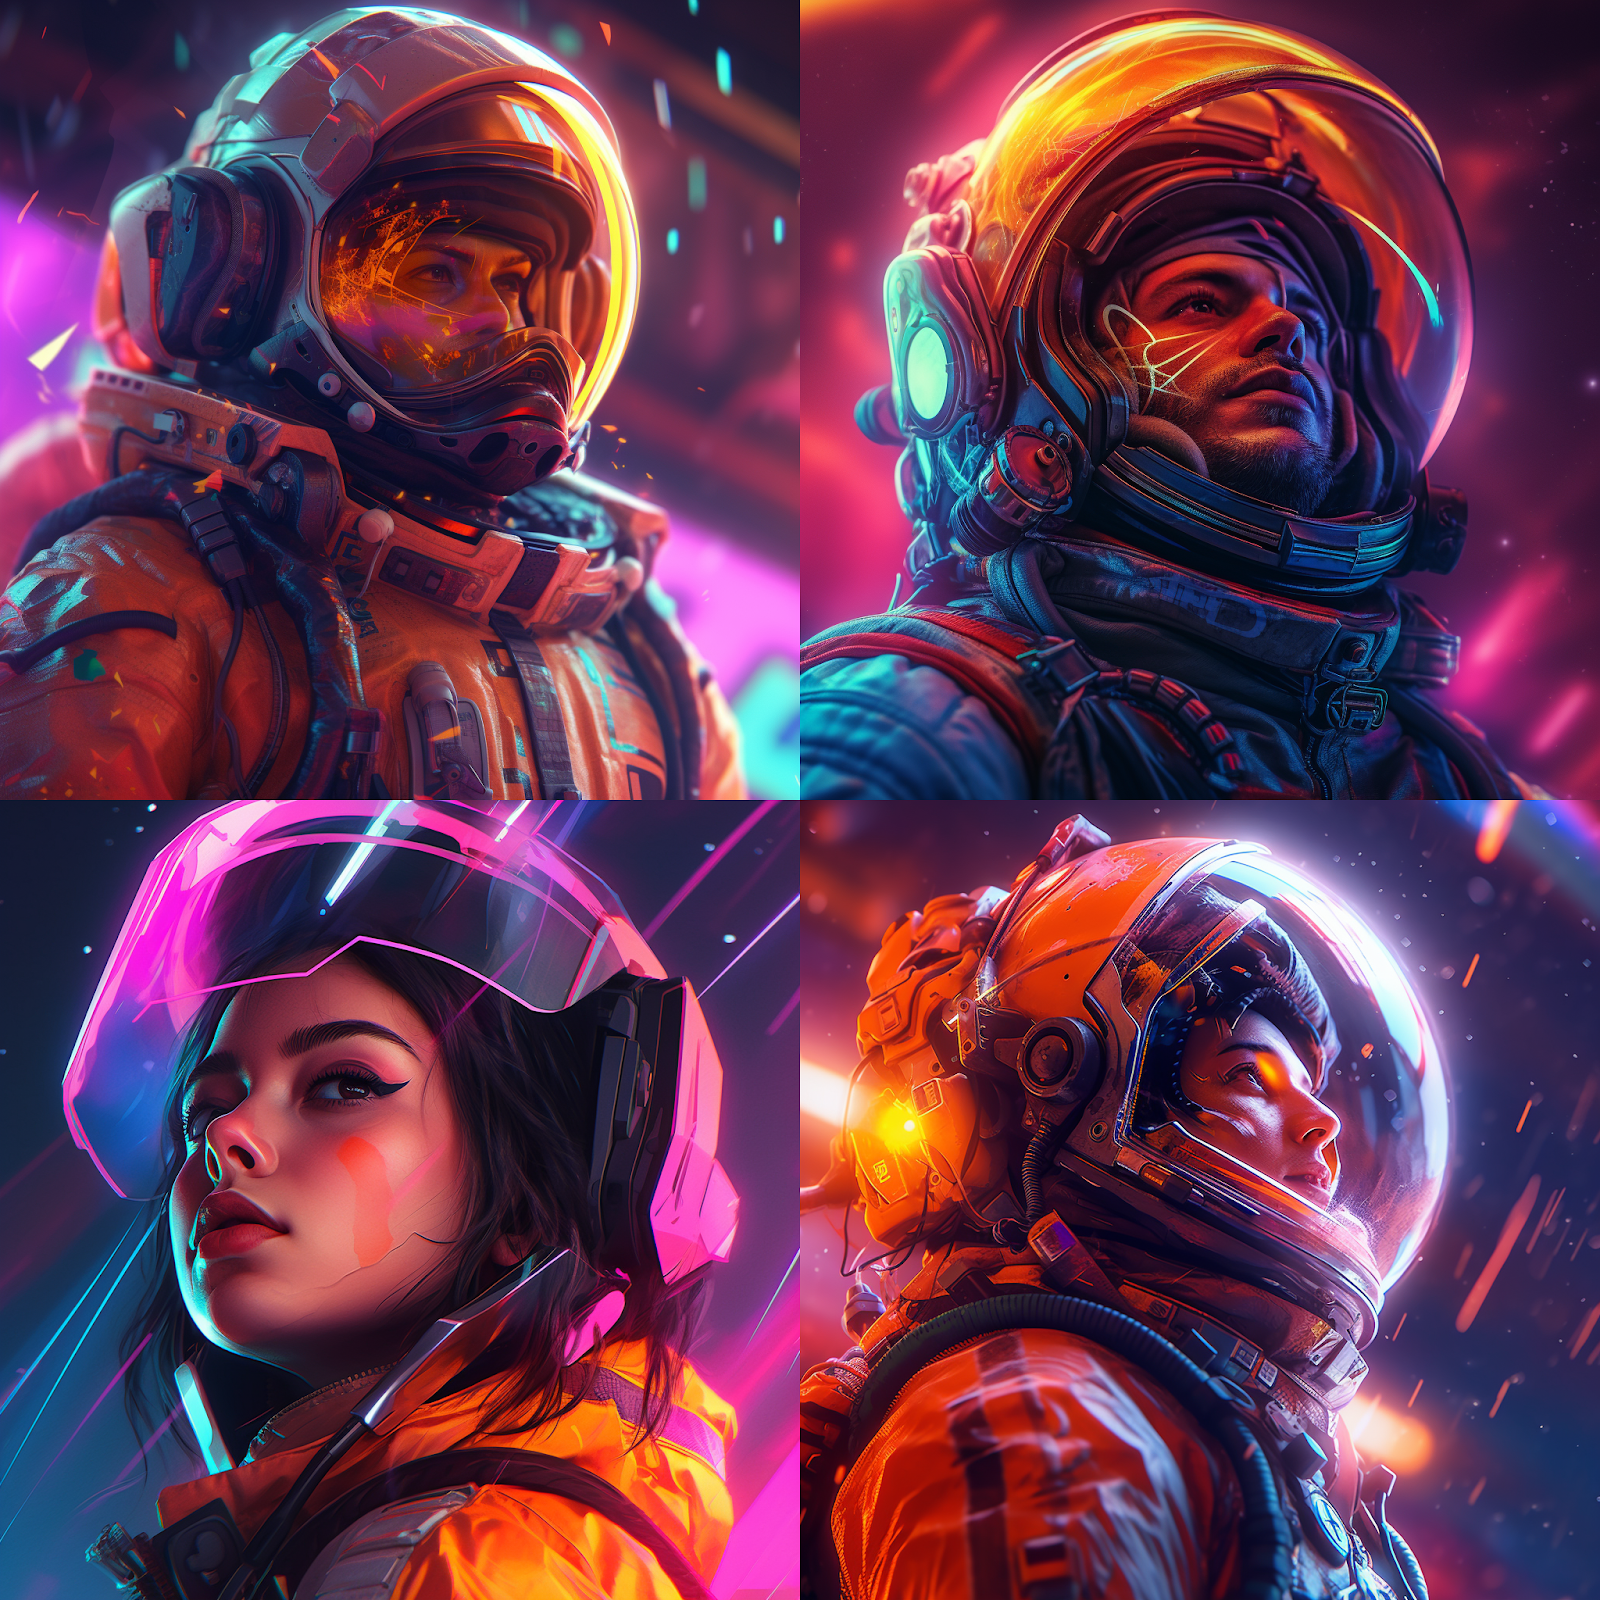
Now you can upscale or create variations of the one you’d like.
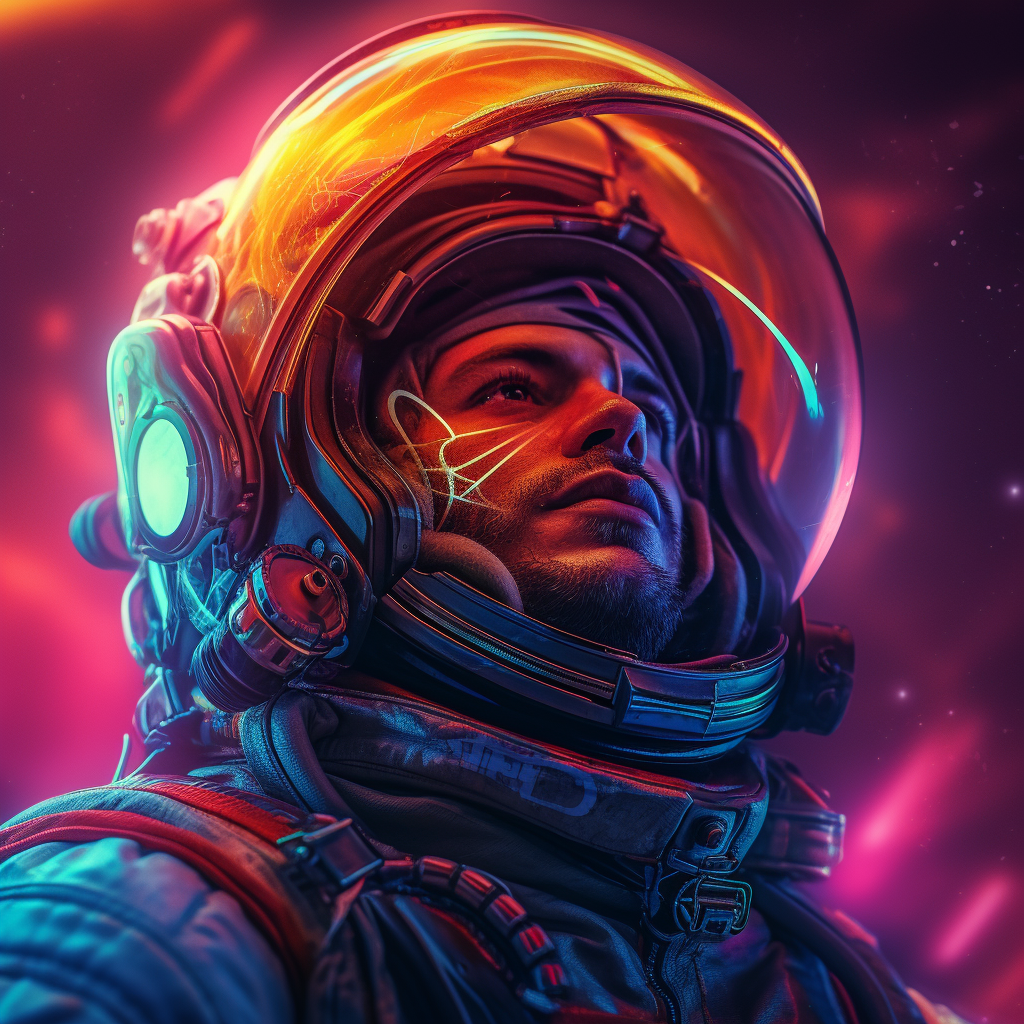
What amazing results for our prompt, with no effort we just created an awesome realistic image of a futuristic astronaut.
Create 3 different prompts that you’ve crafted following the aspects list and let’s move on!
Creating a Palette of Styles
Introduction
Midjourney is not just about generating images from text prompts; it’s about creating art that reflects your unique vision. One of the ways you can customize your images is by specifying a style. This chapter will guide you through the process of using different styles and parameters to create a wide variety of images.
Style – Keyword
Providing a set of supporting prompt keywords associated with “styles” can create different outputs based on what kind of style you opt to choose. Here are some of the keywords and sub-types based on the art form/design/artist/ genre you might want to choose as styles:
Using Design/Genre as Style
You can specify a design or genre as your style output. Examples include:
- Standard
- Japanese anime style
- Pixar movie style
- Cyberpunk style
- Steampunk style
- Waterhouse style
- Bloodborne style
- Grunge style
Example: /imagine a serene forest steampunk style


Using Artist Name as Style
You can also specify the artist as your style output. Examples include:
- Andy Warhol
- Da Vinci
- Salvador Dali
- Picasso
Example: /imagine a starry night painting Picasso style


Using the Rendering/Lighting Properties as Style
You can specify the rendering or lighting properties as your style output.
Examples include:
- Volumetric lighting
- Cinematic lighting
- Octane render
- Softbox lighting
- Glowing lights
- Blue lighting
- Long exposure
- Fairy lights
Example: /imagine a bustling cityscape at dusk with long exposure

Camera Angles Types
In Midjourney, you can specify the camera angle in your prompts to influence the perspective of the generated image. Here are some common camera angles and their descriptions:
- Close-Up: This shot type is used to show detail or emphasize a specific part of the subject. In Midjourney, you might use this to focus on a specific element of your image, like a person’s face or a small object.
Example: /imagine a close-up of a butterfly on a flower.
- Medium Shot: This shot is typically waist-high and used to show the subject in more detail while still capturing some of the backgrounds.
Example: /imagine a medium shot of a man standing in a field.
- Long Shot: This shot type shows the subject in full within their surrounding environment. It’s often used to show large scenes or landscapes.
Example: /imagine a long shot of a castle on a hill.
- Bird’s Eye View: This is an aerial shot that provides a view from directly above the subject. This can be used to show a layout or arrangement of a scene. Example: /imagine a bird’s eye view of a bustling city.
- Low Angle: This shot is taken from a lower point and looks up at the subject, often used to make the subject appear larger or more dominant.
Example: /imagine a low-angle shot of a towering skyscraper.
- High Angle: This shot is taken from a higher point and looks down on the subject, often used to make the subject appear smaller or less dominant. Example: /imagine a high-angle shot of a person walking through a forest.
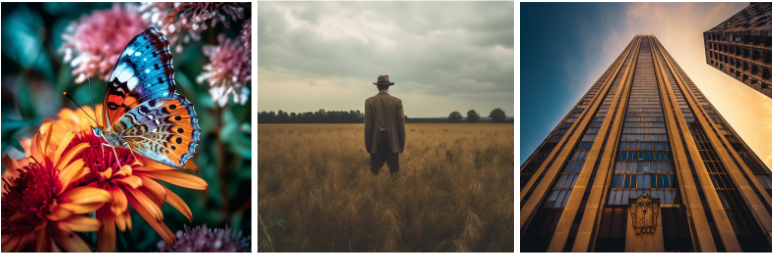
Remember, the key to using these shot types effectively in Midjourney is to include them in your prompt in a way that helps guide the AI to generate the image from the desired perspective. Happy creating!
Mastering Parameters
Stylize the Output
You can add the setting –stylize (–s) <some number> (between 0 to 1000) to stylize the output.
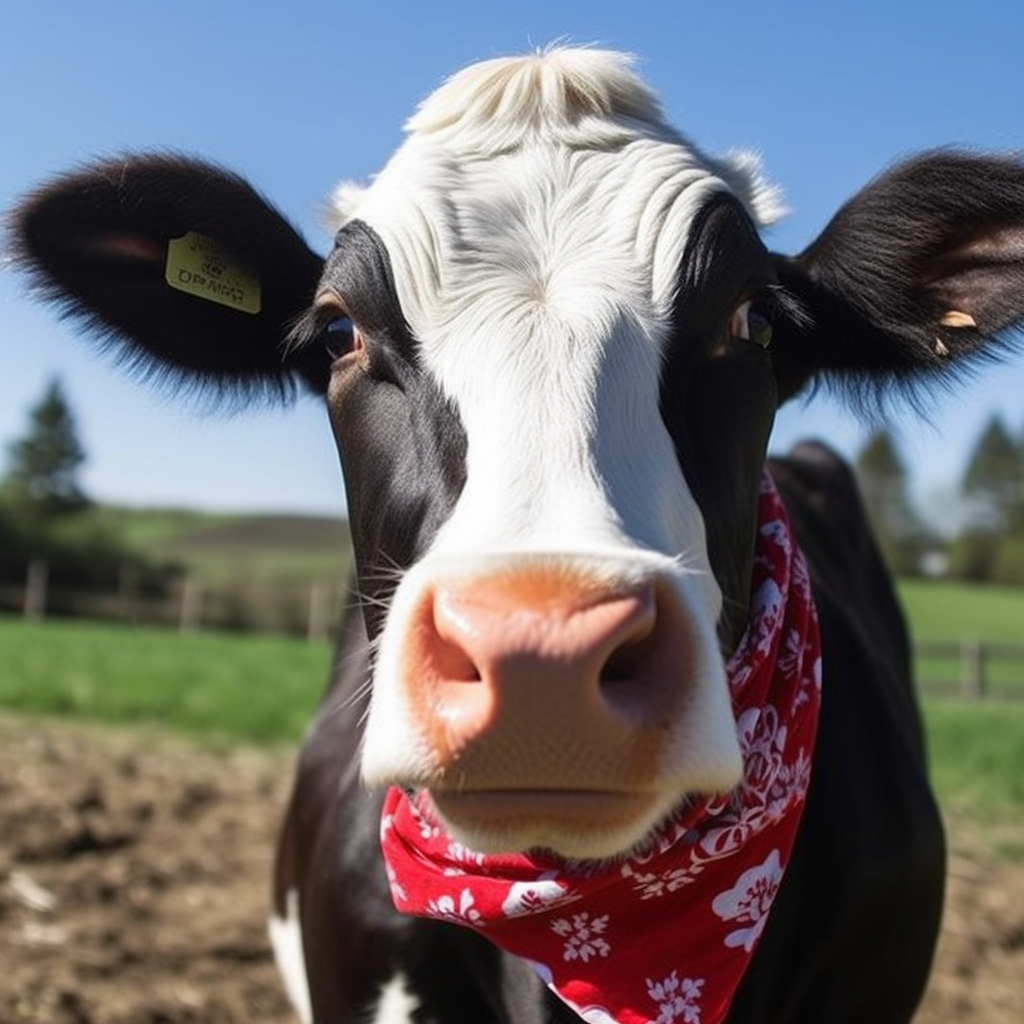
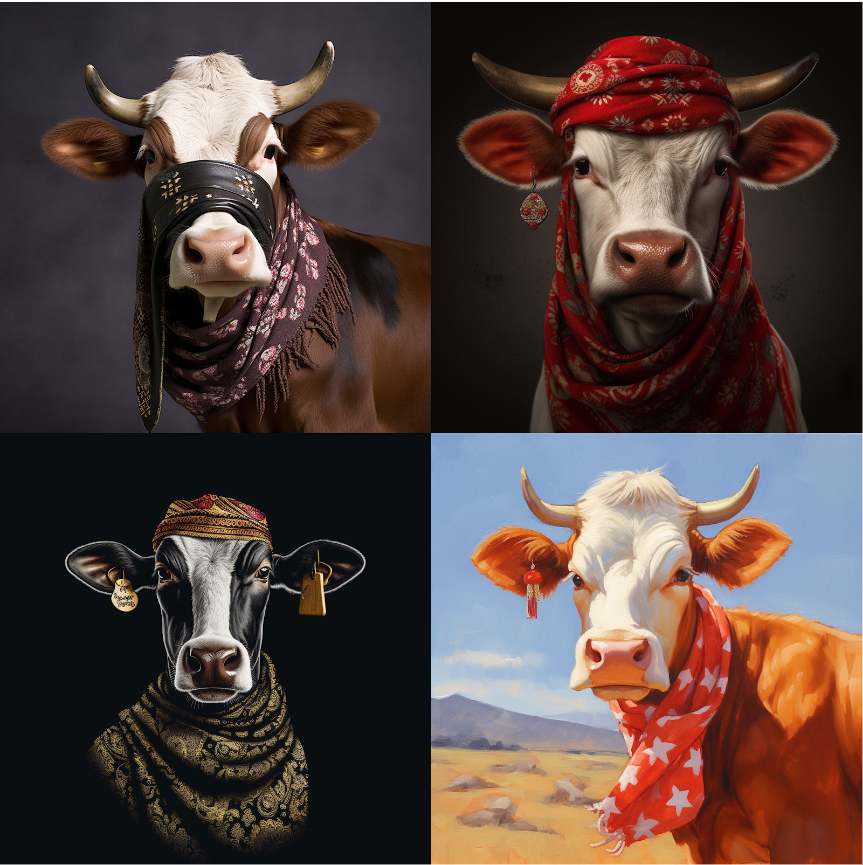
Example: /imagine a cow wearing a bandana –s 500
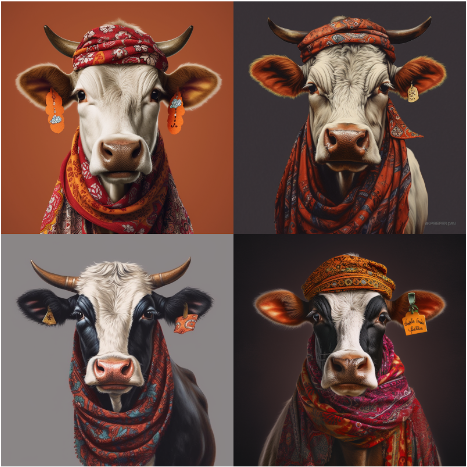
–s 100
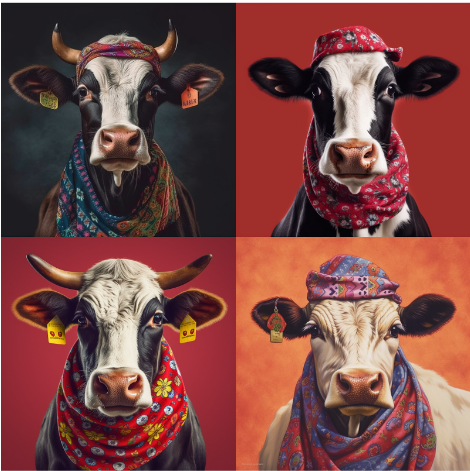
–s 750
Exploring Styles
The –style parameter in Midjourney modifies the aesthetic of generated images. Here are the options:
- Model 5.1 Different styles:
- Default: Standard style for the chosen model.
- Raw: Removes some default Midjourney aesthetic styles.
- Niji Model Styles: Find-tunes the Niji model with different styles:
- Cute: Gives the image a cute aesthetic.
- Scenic: Gives the image a scenic aesthetic.
- Original: Uses the original Niji Model version 5.
- Expressive: Gives the image an expressive aesthetic
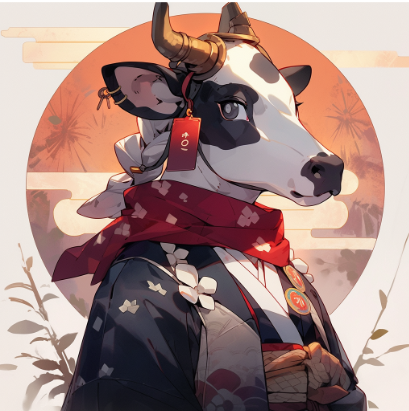
Example: /imagine a cow wearing a bandana –v 5.1 –style raw
Example: /imagine a cow wearing a bandana –niji 5 –style scenic
Chaos – Increase the Abstraction
The –chaos (–c) parameter takes a number from 0 to 100 to increase or decrease the level of abstraction in the subject.
Example: /imagine a cow wearing a bandana –c 70
Resolution
To specify the output resolution, you can use some of the usual keywords like 8K, 4K, photorealistic, ultra photoreal, ultra-detailed, intricate details, etc. Or you can go with the standard settings for predictable outputs hd and quality / –q are two such settings.
The quality parameter only accepts – .25 .5 and 1, the default value is 1.
Examples:
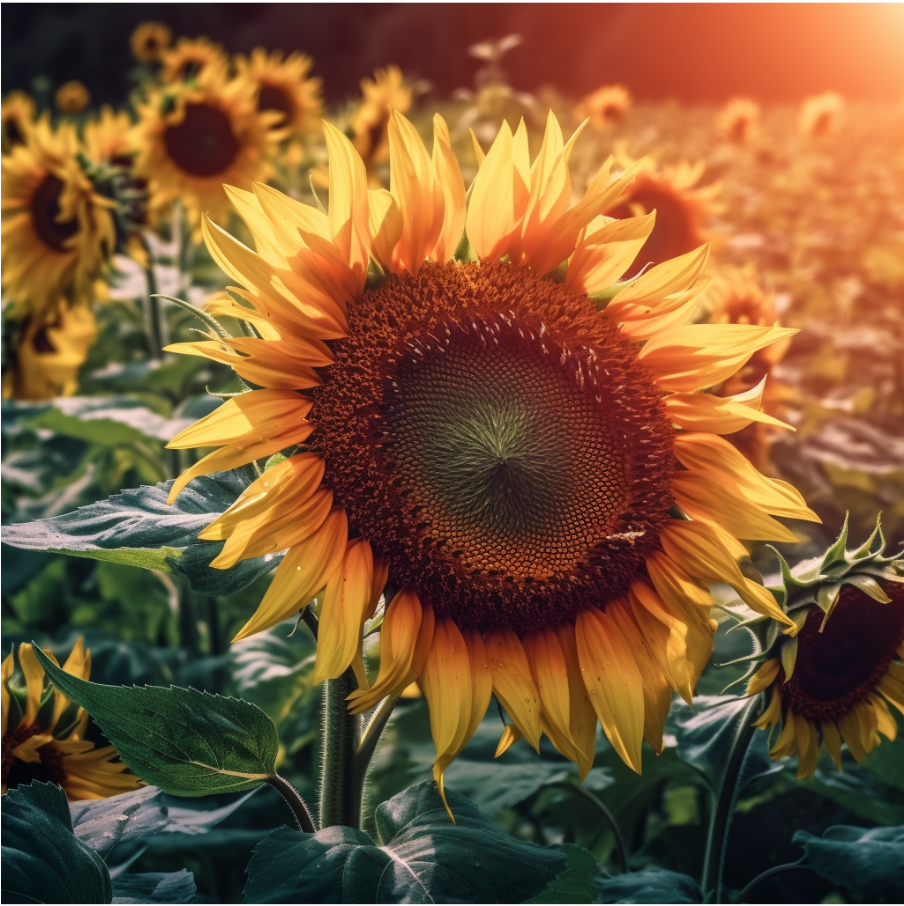
- /imagine a blooming sunflower –hd
- /imagine a blooming sunflower 4k,8k –quality 1
Aspect Ratio
You can specify the ratio of the width:length of your output image. This is called the aspect ratio. The default output is a square image (1:1 aspect ratio). But if you want a more cinematic view — or you just want to make wallpaper for your laptop, you can change the aspect ratio.
Examples:
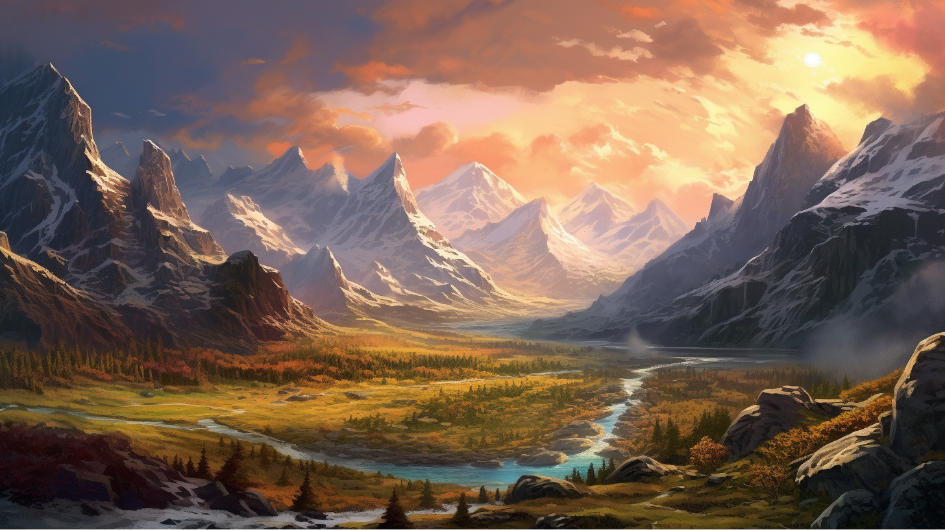
- /imagine a mountain landscape –ar 16:9
- /imagine a mountain landscape –w 800 –h 400
Creating Patterns using the Tile parameters
The Tile parameter is used with the –tile command. When used, Midjourney generates an image that seamlessly tiles with copies of itself. This means that if you were to place copies of the image side by side or top to bottom, the edges would match up perfectly, creating a continuous pattern.
Example: /imagine a starry night sky –tile
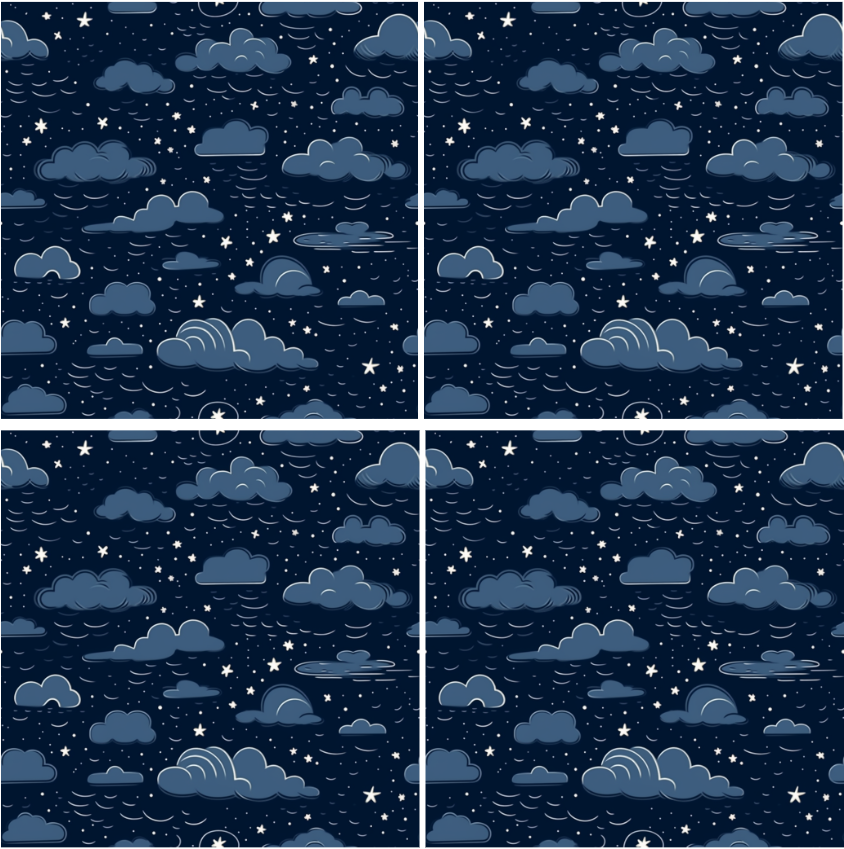
Those are 4 copies of the same image… Amazing isn’t it?
Weights to Image Prompt
If you want your output to look more like your prompt image, give a higher weightage to that image (–iw <number> .5-2).
Example:

Comment: This is not working with every version.
Weights to Text Prompt
You can also assign weights to different parts of your text prompt.
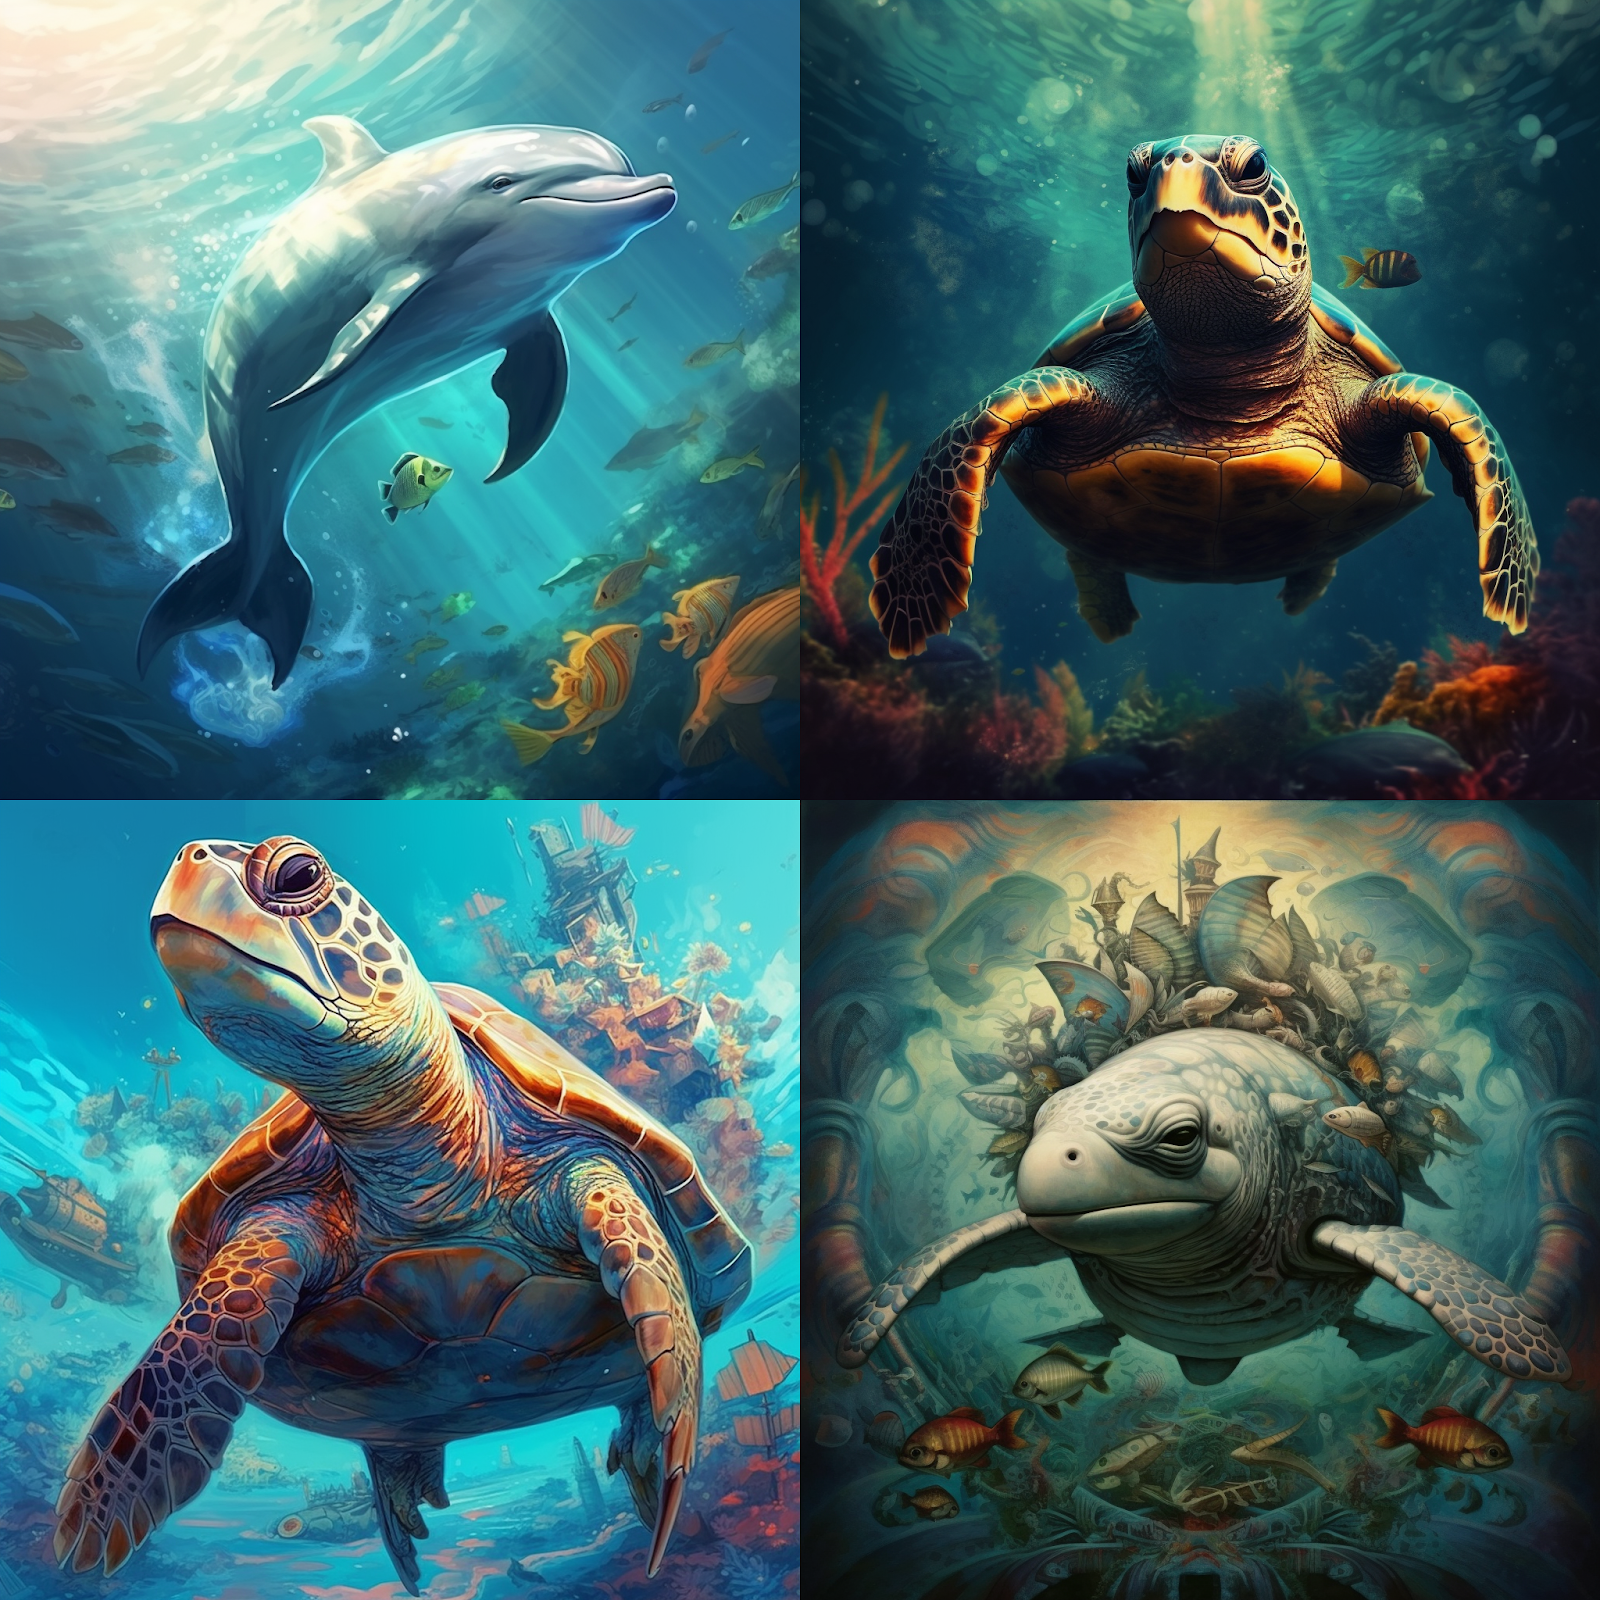
Example: /imagine marine life dolphin::3 shark::2 turtle::4
Filtering out Words from Your Image
Use the –no keyword to discard any unwanted subjects popping in your image.
Example: /imagine greek pizza –no olives
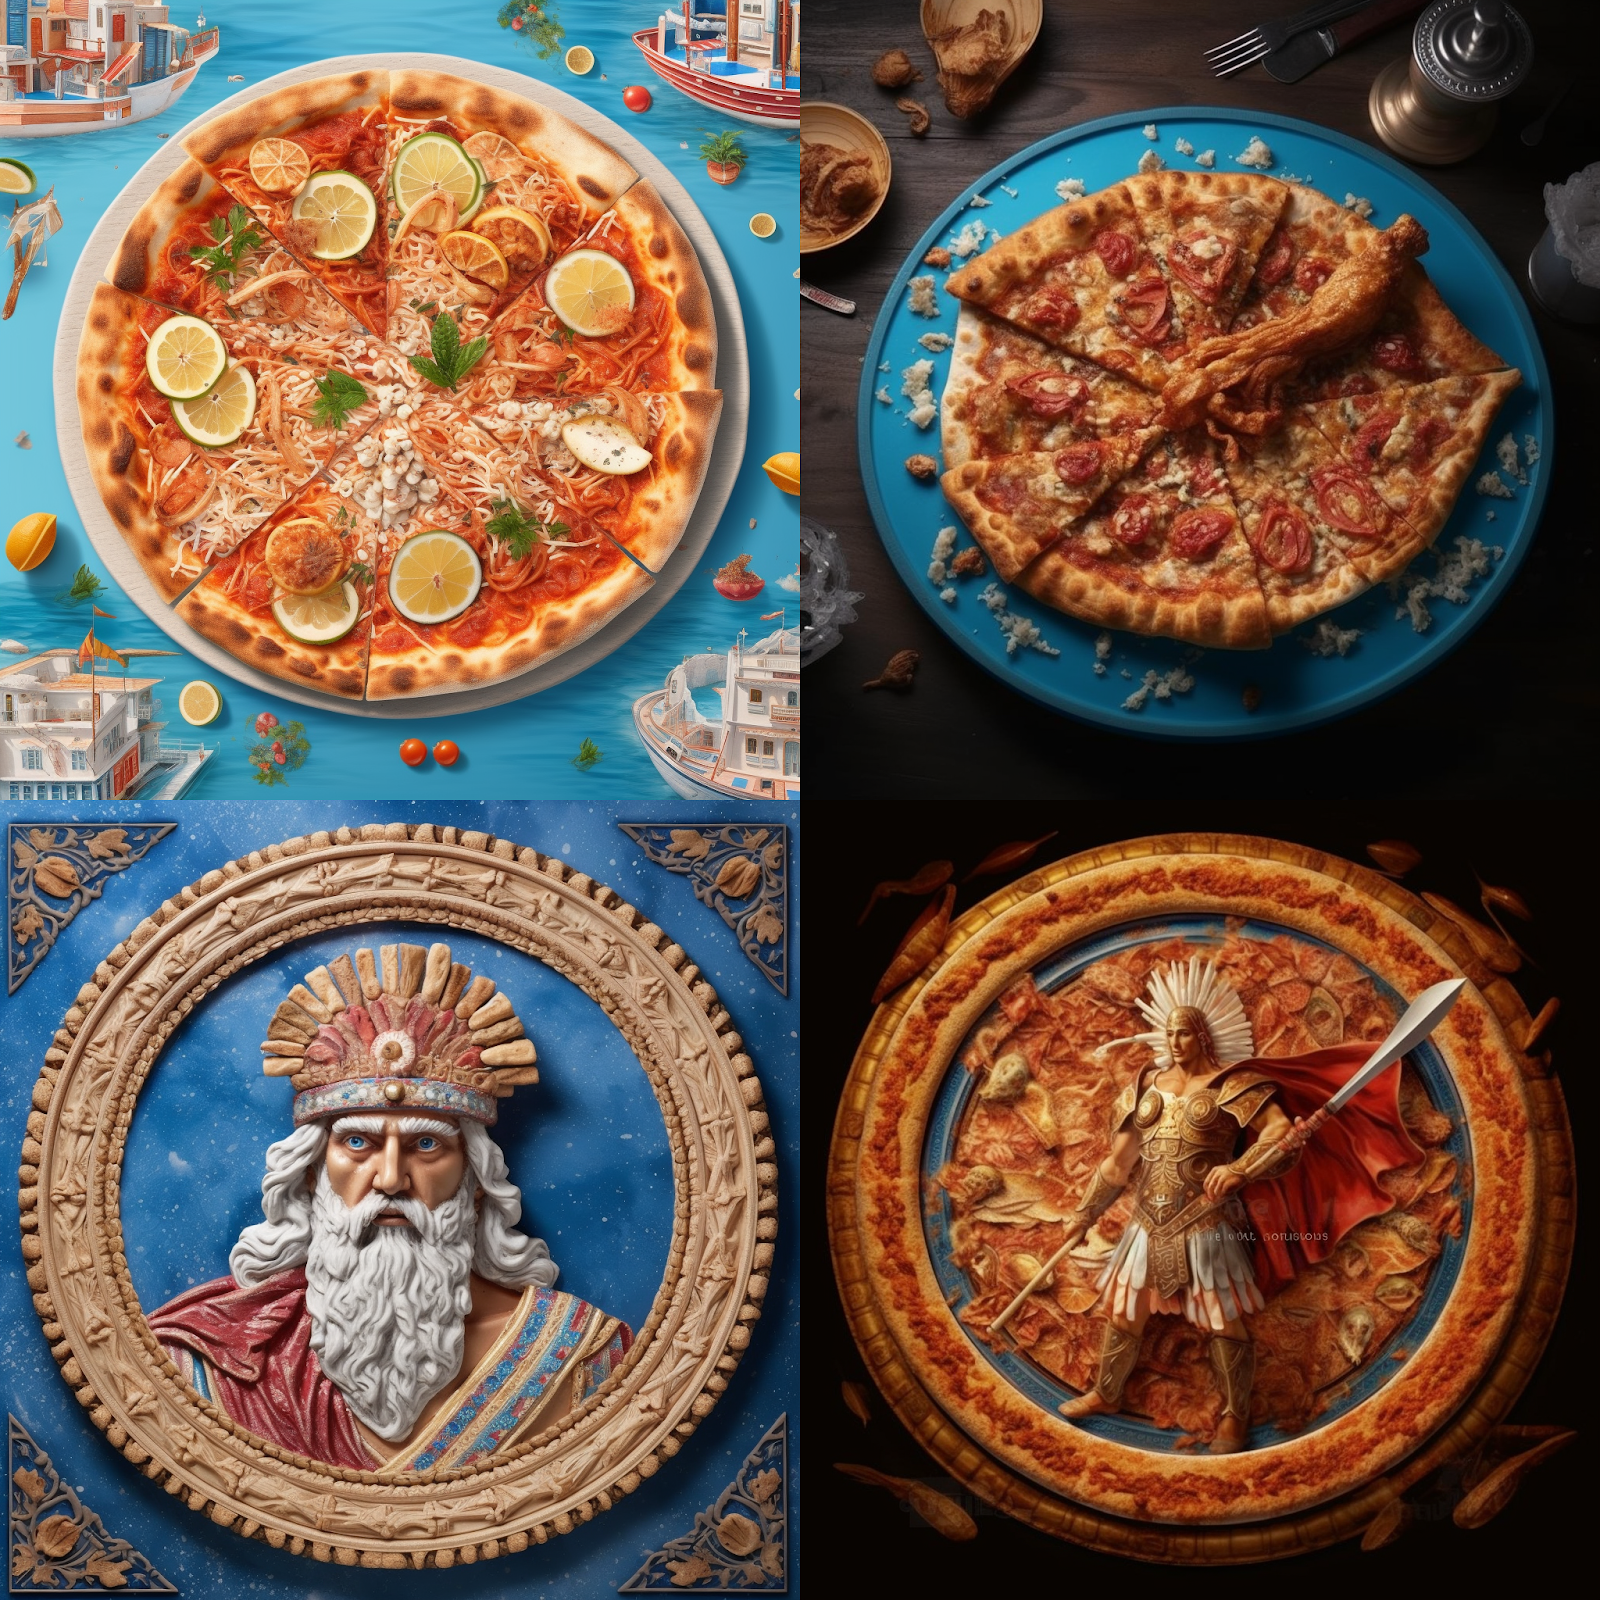
At least there are no olives on it😂
Seed Your next Prompt
The Seed parameter in Midjourney plays a crucial role in the image generation process. It creates a field of visual noise, similar to television static, which serves as the starting point for generating the initial image grids.
The Seed parameter can be specified using the –seed or –sameseed command. If no Seed is specified, Midjourney will use a randomly generated seed number, resulting in a wide variety of options each time a prompt is used.
In summary, the Seed parameter is a powerful tool that gives you more control over the image generation process in Midjourney, allowing for consistency, experimentation, reproducibility, and a degree of control over the final output.
Here’s an example of how to use the Seed parameter:
/imagine a crazy guy running wild –seed 123
This will generate an image based on the prompt “a crazy guy running wild” with the seed number 123. If you were to run this command again with the same seed number, you would get a similar image.
How do I get a randomly generated seed?! Great question:
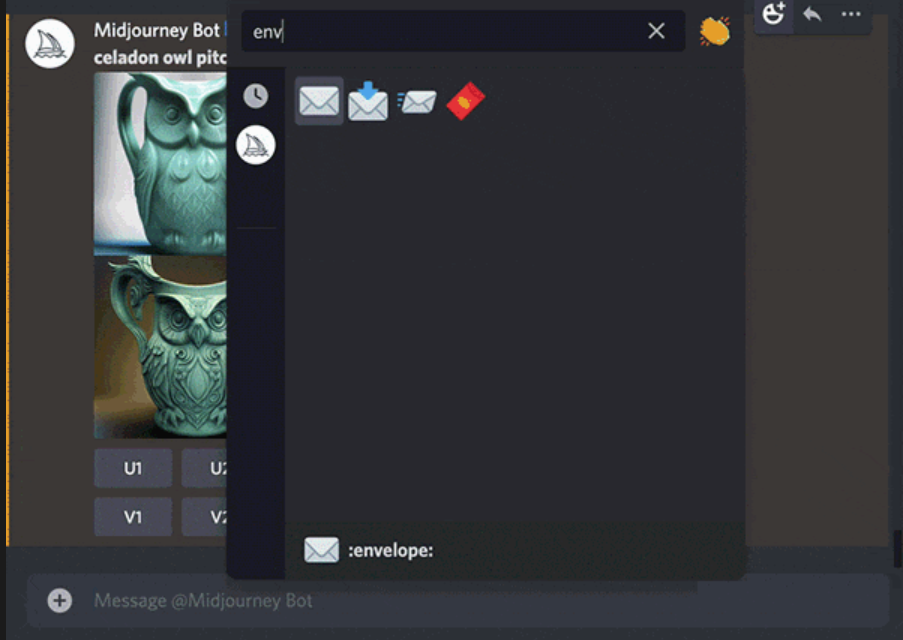
React with the envelope emotion on the desired grid / upscale. Midjourney will send you the relevant information.

Prompt, Liked, Repeat!!
The Repeat parameter in Midjourney, denoted as –repeat or –r, allows you to run a job multiple times. This can be particularly useful when you want to generate multiple variations of the same prompt.
For example, if you have a prompt that you like and you want to see different interpretations of it, you can use the Repeat parameter to generate multiple images from the same prompt.
Here’s how you might use it:
/imagine a girl looking into the future –repeat 5
This command will generate five different images based on the prompt “a girl looking into the future”.
The Repeat parameter can be combined with other parameters, like Chaos, to increase the pace of your visual exploration. It’s available for Standard and Pro subscribers, with Standard subscribers able to repeat values 2–10 and Pro subscribers able to repeat values 2–40.
Please note that the Repeat parameter can only be used in Fast GPU mode. Also, using the redo (re-roll) button on the results of a Repeat job will only re-run the prompt once.
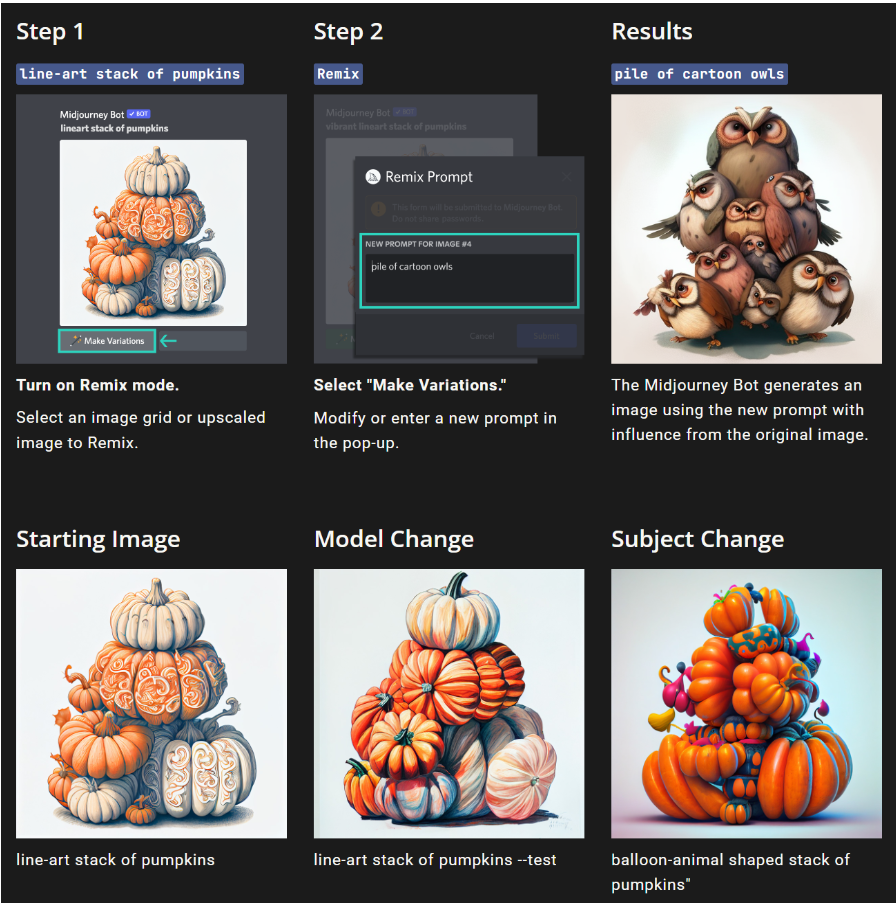
Remix Mode
Remix Mode is a unique feature in Midjourney that allows you to modify the prompt, model version, or parameters between variations. It builds on the starting image to create new images, taking the general composition of your starting image and using it as part of the new job. This can be particularly useful for changing the setting or lighting of an image, evolving a subject, or achieving tricky compositions.
How to Use Remix Mode
Here are the steps to use Remix Mode:
- Activate Remix Mode: You can activate Remix mode with the /prefer remix command or by using the /settings command and toggling the 🎛️ Remix Mode button. Once Remix Mode is enabled, it changes the behavior of the variation buttons (V1, V2, V3, V4) under image grids, allowing you to edit your prompt during each variation.
- Select an Image: Select an image grid or upscaled image to Remix.
- Make Variations: Select “Make Variations” and modify or enter a new prompt in the pop-up.
- Generate Image: The Midjourney Bot will generate an image using the new prompt with influence from the original image.
- Turn Off Remix Mode: When you are done with Remix, use the /settings or /prefer remix command to turn it off.
Using Parameters with Remix
You can add or remove Parameters while using Remix mode, but you must use valid parameter combinations.
Only parameters that normally influence variations will work while using Remix. These include Chaos, Image Weight, No, Quality, Seed, Stop, Stylize, and Tile.
Note that changing aspect ratios with Remix will stretch an image. It will not extend the canvas, add missing details, or fix a bad crop.
Conclusion
Remix Mode is an experimental feature that may change or be removed at any time. It offers a unique way to experiment with your prompts and generate a variety of images from a single starting point. As with all features in Midjourney, the key to mastering Remix Mode are experimentation and practice. Happy remixing!
Chapter 3: Advanced Techniques and Artistic Exploration
The Boundless Inspiration of Midjourney: Midjourney’s Web Application
To access the Midjourney web app, visit the homepage and sign in using your Discord account.
The Midjourney web application is a powerful tool that not only allows you to manage your subscription and view all of your images in one place but also provides a platform to explore and draw inspiration from images created by other Midjourney users.
Managing Your Subscription and Images
The web application is designed to make your Midjourney experience as seamless as possible. You can easily manage your subscription, keeping track of your plan details and making any necessary changes.
In addition, the web application provides a centralized location for all of your generated images. This makes it easy to review your past creations, compare different versions of an image, and organize your work.
The MidJourney Community Showcase: Explore Page
Explore community showcase.
One of the most inspiring features of the Midjourney web application is the Explore page, also known as the Midjourney Community Showcase. This page is a treasure trove of images created by other Midjourney users, each accompanied by the full prompt used to generate it.
The Explore page serves as an unlimited source of inspiration. By browsing through the images, you can see how others are using Midjourney, discover new ideas for prompts, and learn from the creative approaches of the community.
Seeing the full prompts alongside the images also provides valuable insight into how specific prompts translate into visual output. This can help you understand how to craft more effective prompts and predict how the AI might interpret your instructions.
Access and Features Based on Membership
While free members can access a limited version of the community showcase, paid members enjoy additional benefits. As a paid member, you can search for specific prompts or images, filter results based on various criteria, and gain full access to the wealth of inspiration and learning available on the Explore page.
Creating an Image Together Using MidJourney Showcase
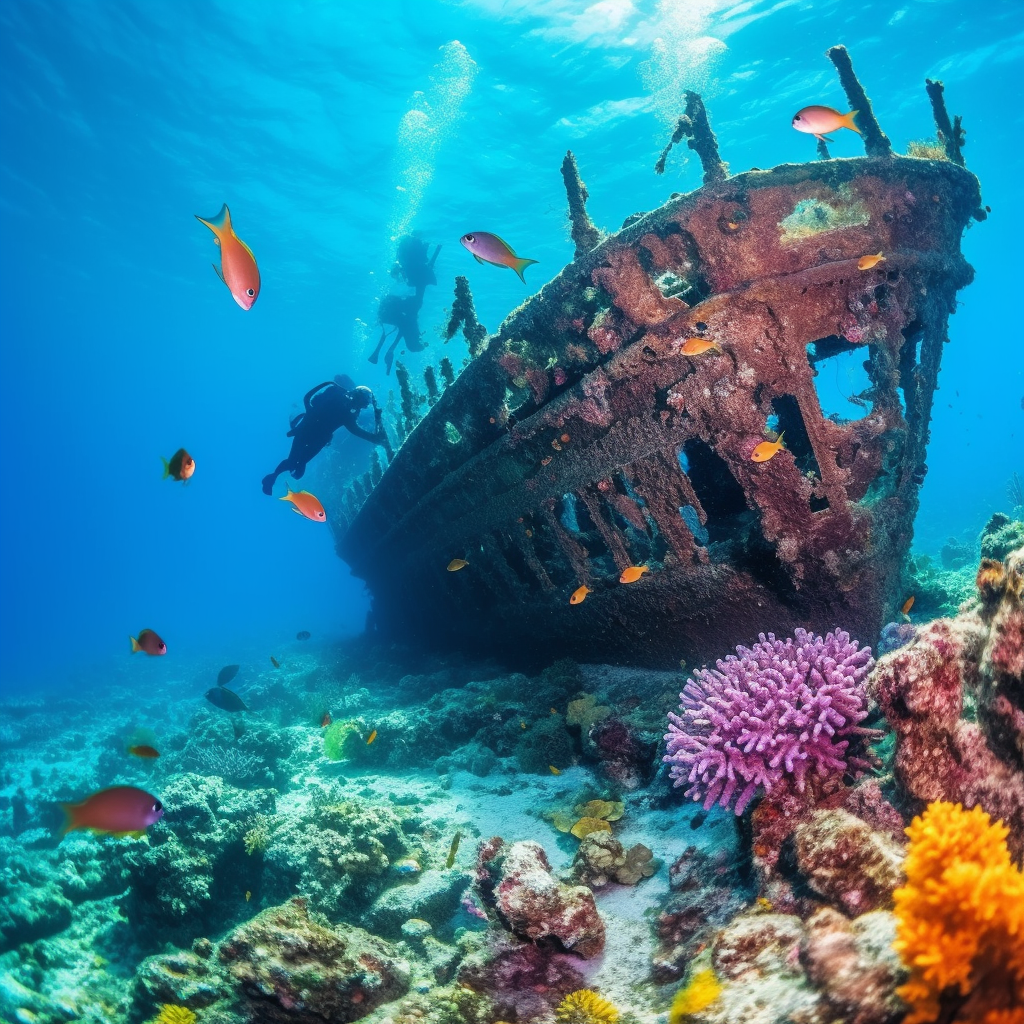
Exercise: Create a prompt that outputs “An underwater scene showing a vibrant coral reef teeming with colorful fish, a sunken pirate ship in the background, and a group of divers exploring the ship.”
Let’s do it using the Midjourney community showcase. First, let’s search for a similar image that we can use.


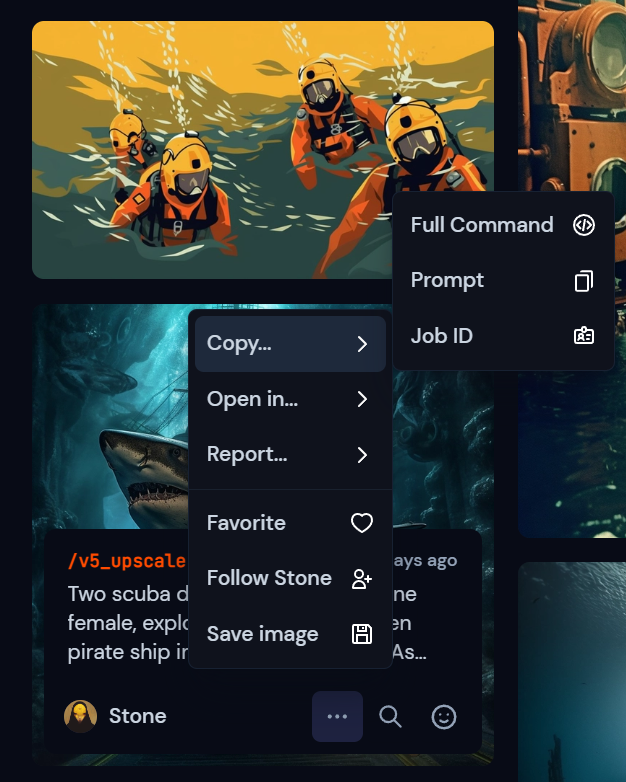
We found one, let’s copy the full command to see which parameters the artist used.
“Two scuba divers, one male, and one female, exploring an ancient sunken pirate ship in crystal-clear water. As they swim through the dark chambers of the ship, they encounter a majestic shark that curiously circles around them. The scene appears photorealistic and captivating. –s 750 –v 5.1 –style raw”
First Try
We’ll change the prompt to match our vision:
“crystal-clear water vibrant coral reef teeming with colorful fish. In the background divers, exploring an ancient sunken pirate ship –s 750 –v 5.1 –style raw”
The results:
Great, we got exactly what we wanted! but… I don’t like this image.
Second Try
Let’s adjust the prompt so we get a more detailed and realistic image that matches the exercise goal output.
Some of the prompts that I tried:
- ultra-realistic, wide angle lens, deep sea vibrant coral reef with colorful fish. divers::3, exploring an ancient sunken pirate ship, 4k –v 5.1 –style raw –ar 16:9
- ultra-realistic, far-shot angle, deep sea, underwater, deep-sea divers::3, exploring an ancient sunken pirate ship, vibrant coral and surrounded by schools of colorful fish 4k –v 5.1 –style raw –ar 16:9
The prompt that produces the end result:
“hyperrealistic, far-shot angle, deep sea, underwater, deep-sea divers::3, exploring an ancient sunken pirate ship, vibrant coral and surrounded by schools of colorful fish 4k –v 5.1 –ar 16:9 –s 750”
After a few tries…

End result:

That’s just one example of how you can use others’ art for inspiration and guidance.
Realism in AI Art
In this chapter, we’ll explore how to use Midjourney to create stunningly realistic images. We’ll walk through a step-by-step exercise to help you understand the process and techniques involved.
Exercise: Creating a Realistic Landscape
For this exercise, we’ll aim to create a realistic image of a serene lake surrounded by a forest at sunset.
- Crafting the Prompt: The first step is to craft a detailed and specific prompt. For a realistic image, it’s important to include as many details as possible. Here’s an example: /imagine a serene lake surrounded by a dense forest, with the sun setting in the background and casting a warm golden light on the scene.
- Choosing the Model: For realistic images, it’s best to use the latest Midjourney model, as it’s trained on a wide variety of images and can generate highly detailed and realistic outputs.
- Using Keywords for Realism: To achieve a more realistic result, consider using keywords in your prompt that are associated with realism. For example, you might include words like “photorealistic”, “detailed”, “4k/8k” or “lifelike” in your prompt.
- Use Specific Camera Models: The Sony α7 III, Nikon D850 DSLR 4k, Canon EOS R5, or even the Hasselblad can be used to create high-quality images with realistic colors and details.
- Use a Long Lens: An 85mm, 100mm, or 200mm lens can help isolate portrait subjects and create a shallow depth of field. This can make the subject stand out and appear more prominent.
- Use Dreamlike or Dramatic Lighting: This can create a sense of depth and contrast in the image. For example, you can create a portrait of a person with dramatic lighting, casting strong shadows and highlights on their face.
- Use the “–testp” Command: This puts Midjourney into photo-realism mode, creating images that look like real photographs.
- Generating the Image: Once you’ve crafted your prompt, chosen the model, and included realism keywords, you’re ready to generate your image. Simply enter your prompt into Midjourney and wait for the AI to work its magic.
- Reviewing and Refining: Once the image is generated, take some time to review it. If there are aspects of the image that you’re not happy with, consider refining your prompt and generating a new image. Remember, creating realistic images with AI often involves a bit of trial and error, so don’t be discouraged if you don’t get the perfect result on your first try.
“a serene lake surrounded by a dense forest, with the sun setting in the background casting a warm golden light on the scene, dramatic lighting, detailed, 8k, Sony a7 lll –s 750”

Abstract Creations
In this section, we will explore the fascinating world of abstract art and how to create abstract images using Midjourney. Abstract art is a style of art that does not attempt to represent an accurate depiction of visual reality. Instead, it uses shapes, colors, forms, and gestural marks to achieve its effect.
Understanding Abstract Art
Abstract art can be both non-representational and non-objective, meaning it either distorts an existing reality or doesn’t represent anything specific at all. It’s about expressing emotion, concepts, or ideas that may not be rooted in the physical world.
Creating Abstract Images with Midjourney
Creating abstract images with Midjourney is a process that involves experimentation and creativity. Here are some steps to guide you:
- Start with a Concept or Emotion: Abstract art is often about conveying a feeling or an idea. Start by thinking about what you want to express. It could be a specific emotion like joy, sadness, or anger, or it could be a more complex concept like chaos, tranquility, or the passage of time.
- Choose Your Colors and Shapes: Colors and shapes are crucial elements in abstract art. They can convey different emotions and ideas. For example, warm colors like red and orange can convey passion and energy, while cool colors like blue and green can convey calmness and tranquility. Similarly, geometric shapes can convey order and precision, while organic shapes can convey naturalness and spontaneity.
- Experiment with Different Prompts: The beauty of Midjourney is that you can experiment with different prompts and see the results instantly. Try different combinations of words and phrases to see what kind of abstract images you can create. Remember, there are no right or wrong answers in abstract art. It’s all about expressing your unique perspective and creativity.
- Use the “–chaos” Parameter: The “–chaos” parameter in Midjourney can be used to increase the level of abstraction in your images. The higher the number, the more chaotic and abstract the image will be.
- Experiment with Different Models: Different models in Midjourney can produce different results. Experiment with different models to see which one produces the kind of abstract images you like.
Examples of Abstract Prompts
Here are some examples of abstract prompts you can try:
- “/imagine a feeling of joy expressed in vibrant colors”
- “/imagine the concept of time represented in swirling shapes”
- “/imagine the emotion of anger depicted in sharp, jagged lines”
- “/imagine the tranquility of a calm sea represented in soft, flowing forms”
Remember, the key to creating abstract images with Midjourney is to experiment and have fun. Don’t be afraid to try different things and see what works for you. The possibilities are endless!

Animating Imagination
Creating cartoon images with Midjourney is a fun and creative process that allows you to bring your animated ideas to life. In this section, we’ll explore the different options and techniques you can use to generate cartoon-style images.
Using Keywords
The first step in creating cartoon images is to use keywords that indicate the cartoon style in your prompt. Keywords like “cartoon”, “anime”, “comic”, or specific cartoon styles like “Disney style” or “Pixar style” can guide Midjourney to generate images in those styles. For example:
/imagine a mischievous cat in Disney style

Using Parameters
Parameters can be used to further refine your cartoon images. Here are a few that can be particularly useful:
- Style (–style): The style parameter can be used to apply different artistic styles to your image. For example, you could create a cartoon image in the style of a specific artist or art movement.
- Chaos (–chaos): The chaos parameter can be used to add a level of randomness or unpredictability to your cartoon images, which can result in more dynamic and interesting results.
- Stylize (–stylize or –s): The stylize parameter influences how strongly Midjourney’s default aesthetic style is applied to Jobs. By adjusting the stylize value, you can control the level of stylization in your cartoon images.
Using the Niji Model
The Niji model, a collaboration between Midjourney and Spellbrush, is specifically tuned to produce anime and illustrative styles. If you’re interested in creating anime-style cartoon images, the Niji model can be a great choice. You can switch to the Niji model using the –niji command.
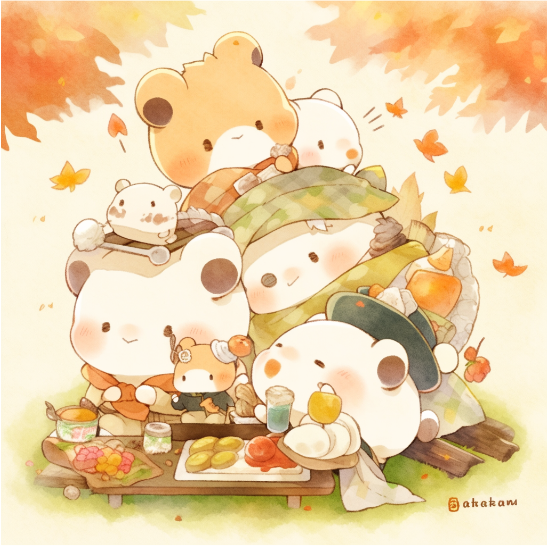
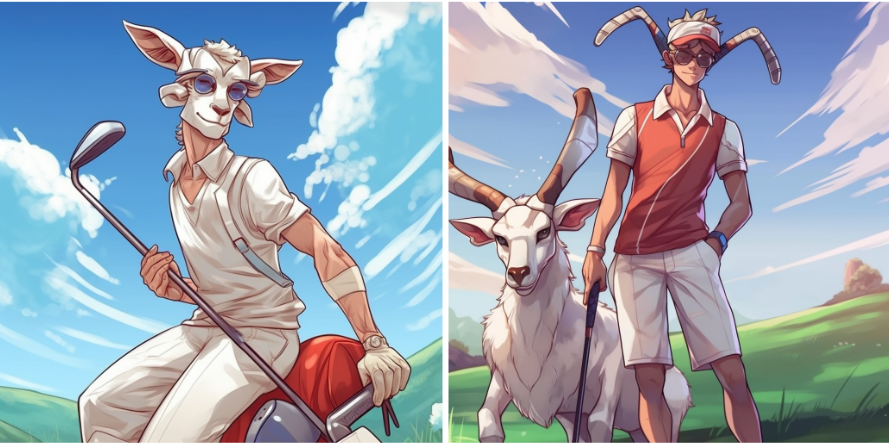
Examples of Cartoon Prompts:
/imagine a group of cute animals having a picnic in anime style –niji –style cute
/imagine a superhero who is half goat half golf player anime style –s 750
Crafting Composite Images
Composite images are a powerful form of visual storytelling that combine multiple elements into a single image. In this section, we’ll explore how to create composite images using Midjourney.
Understanding Composite Images
A composite image is made up of two or more photographs or elements that are combined into one image to create a final piece. This technique is often used to create surreal or fantastical images or to visually represent complex ideas or narratives.
Creating Composite Images
Creating composite images with Midjourney involves crafting a prompt that includes multiple elements. Here’s a step-by-step guide:
- Plan Your Image: Before you start, have a clear idea of what you want your final image to look like. What elements do you want to include? How do they relate to each other? How do they contribute to the overall message or story of your image?
- Craft Your Prompt: Your prompt should include all the elements you want in your final image. Be as specific as possible about each element and its relationship to the others. For example, if you want to create an image of a mermaid sitting on a rock in the middle of the ocean with a full moon in the sky, your prompt might be something like “/imagine a mermaid sitting on a rock in the middle of the ocean under a full moon“.
- Use the “::” Operator: The “::” operator in Midjourney can be used to specify the relative importance of different elements in your image. For example, if you want the mermaid to be the main focus of your image, you might use the prompt “/imagine a mermaid::5 sitting on a rock::3 in the middle of the ocean::2 under a full moon::1“. The higher the number after the “::”, the more emphasis will be placed on that element.
- Leverage Advanced Features: Midjourney offers several advanced features that can help you create more complex and unique composite images:
- Remix: This feature allows you to take an existing image and modify it with new elements.
- Seed: The seed parameter allows you to generate different variations of the same prompt. By changing the seed value, you can create multiple unique images from the same prompt.
- Style: The style parameter allows you to apply different artistic styles to your image. For example, you could create a composite image using 5.1 raw style / Niji expressive style, etc.
Review and Refine: Once you’ve generated your image, review it and see if it matches your vision. If not, refine your prompt and try again. Creating composite images often involves a bit of trial and error, so don’t be discouraged if you don’t get the perfect result on your first try.
Examples of Composite Prompts Thought Process
Example 1:
/imagine Hyperrealistic shot one female latin american 50 years old and one female Caucasian 30 years old facing each other and standing very close to each other –ar 16:9
This Midjourney prompt is effective for several reasons:
- Specificity: The prompt is very specific about the subject of the image. It specifies not only that there are two women, but also their ages and ethnicities. This level of detail helps guide the AI in generating the desired image.
- Action: The prompt includes a specific action – the women are facing each other and standing very close. This gives the AI a clear idea of the composition of the image.
- Adjective Usage: The term “Hyperrealistic” is used to indicate the desired style of the image. This helps the AI understand the level of detail and realism that should be present in the image.
- Shot Type: The term “shot” suggests a photographic or cinematic framing, which could imply a certain level of detail and composition.
Overall, this prompt is a good example of how to use specific details and descriptive language to guide AI in generating a specific and complex image. Notice that he does not contain any parameter except ratio aspects which does not influence the content of the image.
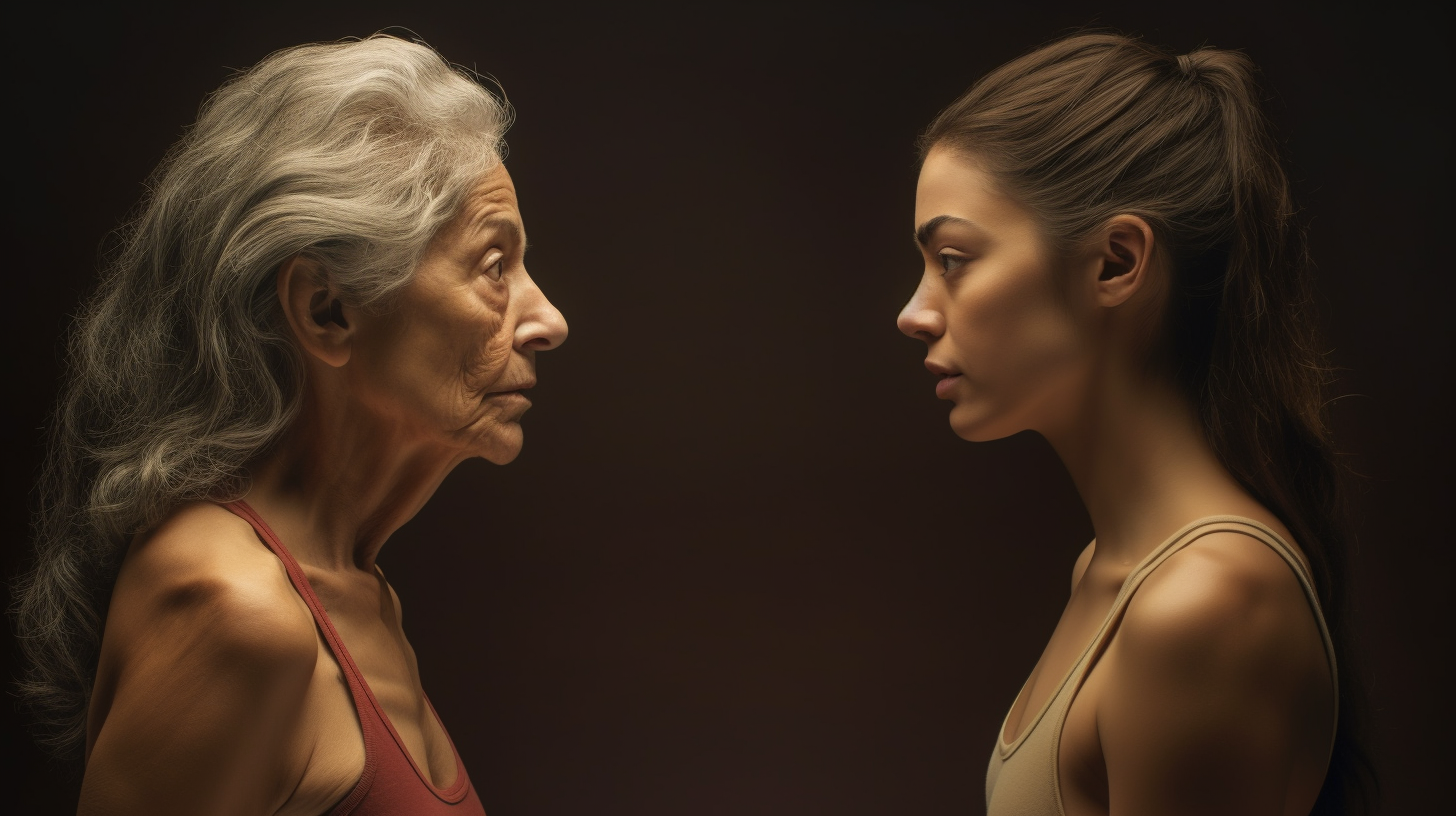
Amazing usage of words to create the perfect result.
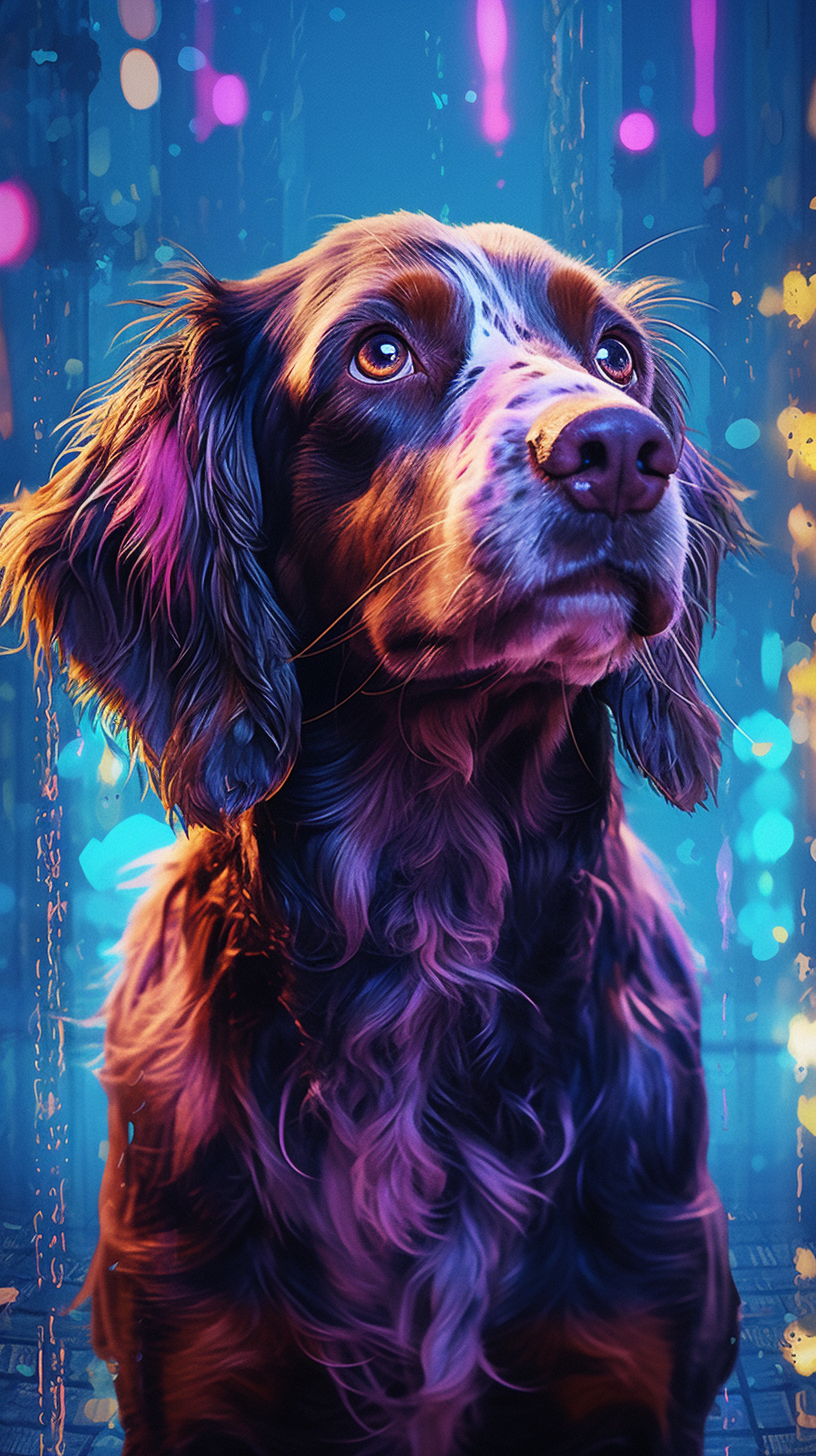
Example 2:
/imagine a dog character, in the style of detailed atmospheric portraits, sparkling water reflections, hyper-detailed illustrations, wandering eye, Fujifilm Eterna vivid 500t, sky-blue and magenta, intense close-ups –v 5.1 –s 500 –chaos 10 –ar 9:16
This prompt is effective due to its:
- Detail: It specifies the subject (a dog character), the style (detailed atmospheric portraits), and additional elements (sparkling water reflections, hyper-detailed illustrations).
- Color Palette: It mentions specific colors (sky-blue and magenta), guiding the AI towards a certain color scheme.
- Parameters: It uses parameters to specify the model version (–v 5.1), stylization (–s 500), chaos (–chaos 10), and aspect ratio (–ar 9:16), giving precise control over the image generation process.
- Visual References: It references a specific film stock (Fujifilm Eterna Vivid 500T) and a type of shot (intense close-ups), providing the AI with additional visual cues.
Overall, this prompt is a great example of how to use detailed descriptions and specific parameters to guide the AI in generating a complex and specific image.
Example 3:
/imagine a Cartoonish cowboy in a western landscape, skinny, badass, rough lines and hand-drawn quality, raw and gritty appearance, unique charm and a DIY feel, exaggerated proportions, and distinctive facial features, large eyes, expressive mouth, unique hairstyles, using subtle nuances in facial features, rough yet expressive lines, exaggerated character designs, strong contrasts, and intense hues, evoke a sense of humor –ar 4:3 –v 5.1
This prompt is effective for several reasons:
- Specificity: The provides a detailed description of the subject (a cartoonish, skinny, badass cowboy) and the setting (a western landscape). It also specifies the desired aesthetic (rough lines, hand-drawn quality, raw and gritty appearance).
- Style Indicators: The prompt uses specific phrases to indicate the desired style, such as “unique charm and a DIY feel”, “exaggerated proportions and distinctive facial features”, and “rough yet expressive lines”. These descriptors help guide the AI toward the desired cartoonish style.
- Color and Contrast: The mention of “strong contrasts and intense hues” gives the AI guidance on the color scheme and level of contrast in the image.
- Humor: The phrase “evoke a sense of humor” gives the AI an additional layer of context, suggesting that the image should not only look cartoonish but also convey a humorous tone.

BONUS: Monetizing Your Creativity with Midjourney: An AI Art Revolution
Midjourney has revolutionized the digital art world by making it possible for anyone to create stunning and realistic digital artwork. This has opened up a plethora of opportunities for artists and non-artists alike to monetize their creations. Here are some ways you can make money using Midjourney:
1. Transforming Pixels into Profits: Selling Art Prints
The print-on-demand market is growing rapidly, becoming an increasingly popular way for individuals and small businesses to monetize their designs and artwork.
You can upload your design to the PoD platform, and it will be automatically added to the relevant products. PoD services, such as Printify and Printful, allow you to outsource the more labor-intensive aspects of your merchandise business, including inventory management, printing, packaging, and delivery of your products.
This frees up your time to focus on the creative side of your business.
Customers can then order these products on your website or on marketplaces such as Amazon, Etsy, or ShopifyShopifyShopifyShopify.
2. Click, Upload, Earn: Selling Stock Photos with AI
Selling your AI images as stock photos can be a great way to earn a passive income. However, not all stock image websites accept AI-generated photos, so be sure to review their policies and guidelines before submitting your images. AI-friendly stock photo websites include Stock AI, Adobe Stock, Etsy, and Shutterstock.
3. The Art of Selling Ideas: Monetizing Midjourney Prompts
There is a growing market for AI prompts, as more artists and non-artists are seeking ways to create captivating and realistic visuals for personal and commercial use. You can leverage this by selling well-designed prompts on marketplaces like PromptBase, PromptSea, and Etsy.

4. The New Age of Freelancing: Offering AI Art Generation as a Service
You could charge higher fees compared to selling AI art or text prompts when you offer your creativity as a service for clients looking for talented AI artists. Freelancing websites, such as Upwork, Fiverr, and PeoplePerHour, have seen a growing number of AI artists offering their services to potential clients.
5. Storytelling with AI: Creating Graphic Novels and Children’s Books
Venturing into self-publishing of graphic novels and children’s books can potentially earn more from your AI-generated art. Platforms like Amazon FBA and eBay accept AI-generated publications. By self-publishing, you can retain control over the content and distribution of your work and build a following of loyal readers.
You can create those books by using Midjourney and Canva.

6. The NFT Gold Rush: Creating and selling with Midjourney
Creating and selling NFTs with the help of Midjourney AI-image generator is a great way to monetize digital art and other digital collectibles.


Somebody essentially help to make significantly articles Id state This is the first time I frequented your web page and up to now I surprised with the research you made to make this actual post incredible Fantastic job
What i dont understood is in reality how youre now not really a lot more smartlyfavored than you might be now Youre very intelligent You understand therefore significantly in terms of this topic produced me personally believe it from a lot of numerous angles Its like women and men are not interested except it is one thing to accomplish with Woman gaga Your own stuffs outstanding Always care for it up
I just could not depart your web site prior to suggesting that I really loved the usual info an individual supply in your visitors Is gonna be back regularly to check up on new posts
helloI really like your writing so a lot share we keep up a correspondence extra approximately your post on AOL I need an expert in this house to unravel my problem May be that is you Taking a look ahead to see you
Thanks I have just been looking for information about this subject for a long time and yours is the best Ive discovered till now However what in regards to the bottom line Are you certain in regards to the supply
Hello Neat post Theres an issue together with your site in internet explorer would check this IE still is the marketplace chief and a large element of other folks will leave out your magnificent writing due to this problem
Наша группа опытных исполнителей подготовлена предложить вам актуальные системы утепления, которые не только обеспечат прочную протекцию от мороза, но и преподнесут вашему домашнему пространству современный вид.
Мы практикуем с современными материалами, подтверждая долгий срок службы службы и прекрасные итоги. Утепление фасада – это не только экономия тепла на прогреве, но и забота о окружающей природе. Сберегательные подходы, какие мы внедряем, способствуют не только своему, но и сохранению природы.
Самое основополагающее: Утепление дома снаружи услуги у нас стартует всего от 1250 рублей за квадратный метр! Это бюджетное решение, которое сделает ваш дом в истинный приятный локал с минимальными затратами.
Наши работы – это не всего лишь изоляция, это постройка площади, в где всякий элемент отразит ваш индивидуальный стиль. Мы берем во внимание все твои пожелания, чтобы воплотить ваш дом еще больше приятным и привлекательным.
Подробнее на http://ppu-prof.ru
Не откладывайте дела о своем квартире на потом! Обращайтесь к специалистам, и мы сделаем ваш домик не только согретым, но и моднее. Заинтересовались? Подробнее о наших работах вы можете узнать на официальном сайте. Добро пожаловать в мир уюта и качественного исполнения.
Somebody essentially help to make significantly articles Id state This is the first time I frequented your web page and up to now I surprised with the research you made to make this actual post incredible Fantastic job
It is appropriate time to make a few plans for the longer
term and it’s time to be happy. I have learn this
submit and if I may I wish to suggest you some interesting issues or tips.
Maybe you could write subsequent articles relating to
this article. I want to read more issues approximately it!
I simply could not go away your web site prior to suggesting that I really enjoyed the standard info a person supply on your guests Is going to be back incessantly to investigate crosscheck new posts
you are truly a just right webmaster The site loading speed is incredible It kind of feels that youre doing any distinctive trick In addition The contents are masterwork you have done a great activity in this matter
Wow wonderful blog layout How long have you been blogging for you make blogging look easy The overall look of your site is great as well as the content
hiI like your writing so much share we be in contact more approximately your article on AOL I need a specialist in this area to resolve my problem Maybe that is you Looking ahead to see you
Its like you read my mind You appear to know so much about this like you wrote the book in it or something I think that you can do with a few pics to drive the message home a little bit but instead of that this is excellent blog A fantastic read Ill certainly be back
I simply could not go away your web site prior to suggesting that I really enjoyed the standard info a person supply on your guests Is going to be back incessantly to investigate crosscheck new posts
Wow superb blog layout How long have you been blogging for you make blogging look easy The overall look of your site is magnificent as well as the content